My cockpit design

  • Thread starter 888 Tuning
  • 15 comments
  • 4,894 views
717
ll__VENOM__ll
Hey guys,
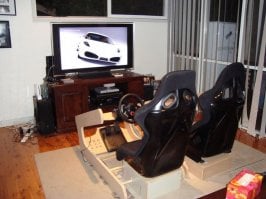
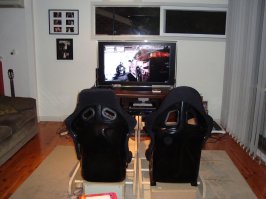
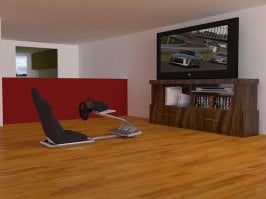
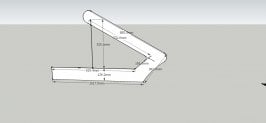
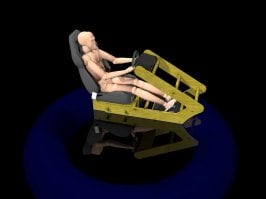
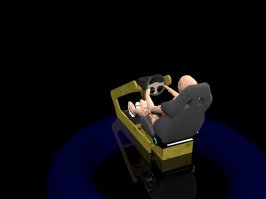
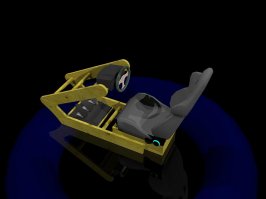
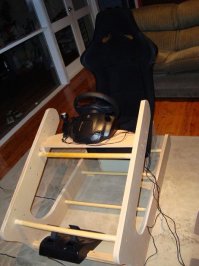
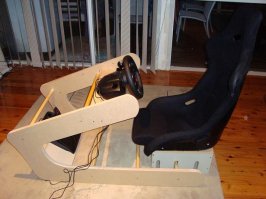
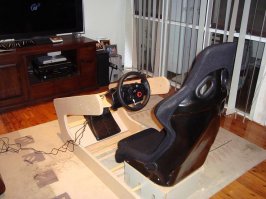
Last week I drew up some sketches then a few better designed pics (attached) for my cockpit design.

I spent Friday actually building it and will post up a couple pics shortly but only changes from the renderings here:
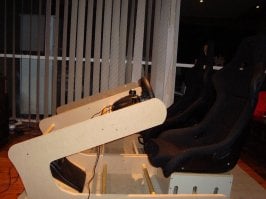
Pedals moved right up to nose and angled for better position
Seat base unit is slotted vertically in several positions allowing it to sit over the wooden cross bars means seat can be moved forward or back very easily for different driver and also lifted off for simple storage.

Approx $70 AUD ($50USD) not including seat and wheel of course.
3 hour build time.

Howzitgo ? Awesome !!!!!!! I cant understand why I waited so long.


***Edit - pics are up
 

Attachments

  • Seat Render 1.jpg
    Seat Render 1.jpg
    28.3 KB · Views: 297
  • Seat Render 3.jpg
    Seat Render 3.jpg
    19.7 KB · Views: 130
  • Seat Render 4.jpg
    Seat Render 4.jpg
    24.8 KB · Views: 136
  • DSC00777.JPG
    DSC00777.JPG
    42.6 KB · Views: 134
  • DSC00776.JPG
    DSC00776.JPG
    43.2 KB · Views: 197
  • DSC00775.JPG
    DSC00775.JPG
    66.8 KB · Views: 210
Last edited:
I moved your post and made a new thread for it. This way more people will see it and comment.


;)
 
:D thanks mate it works really well, just needs a coat of paint.

It impressed the father inlaw enough he asked me to build him one too after spending an afternoon playing GTP....

There is something fun about head to head racing with a bunch of mates and a fist full of beers, and is something that the online game will ultimately remove altogether... but for now, this is how my loungeroom looks :)
(Second wheel not on display)
 

Attachments

  • DSC00779.jpg
    DSC00779.jpg
    77.6 KB · Views: 143
  • DSC00780.JPG
    DSC00780.JPG
    73.3 KB · Views: 74
  • DSC00781.JPG
    DSC00781.JPG
    73.1 KB · Views: 102
Very well thought out design. So did you do the 3D modeling too?
 
Yeah designed it in "Sketchup" to get the measurements and dimensions right.. the 3D renderings done in another (sensationally good) free product called Kerkythea that takes direct exports from Sketchup to help visualize the finished product. :) Once you get the hang of it its very quick.

This was my 2nd or 3rd design.. my preferred model used stainless pipe and would be the design of choice but was going to be a) costly b) damn heavy.. I'll post a 3D model of it when I get home just incase someone else gets inspiration from it.

I timed the build from start to finish of the second seat and it was just on 5 hours which is not too bad.
 
That's remarkably similar to mine (2), though yours are probably lighter and more mobile. Also, mine have seats from an old junker.
I'm hoping to make a set of new ones with two DFGT wheels, and might do something similar to your design. How are the pedals attached though?
 
I looked at a few different ways of attaching the pedals. Initially I cut a square section that fits exactly in the back of the pedals (there is a slot there) and this was ok, but there was still some movement. In the end I put a self tapping screw though the bottom corner of the pedal and its perfect. Others may not want to do this, though its a 2 second job to remove them if needed.
Other option could be to silicone the wood bar into the back of the pedals and then run a self tapper through the back of the foot plate into the pedals.

Its light enough that I can simply pick it up and move it, and as the seat lifts off it can be stored elsewhere on layed down on top of the seat.
Being able to move it easily enough was a requirement.

There are 4 sides (2 slabs on each side) with the inside 2 having the holes drilled (25mm)
The cross bars are 25mm broom handles from hardware shop, cut to 550mm in length.
Each of the 2 side pieces are screwed and glued, and the cross bars are also screwed and glued but are a snug fit in the drilled holes giving good strength.

Attached are the measurements according to Sketchup, which were pretty accurate (I rounded them off)
The base for the seat was made off some simple measurements using another dummy seat but if youd like this too let me know.


Here is another idea I was toying with, but was going to be too pricey once I spoke to the local pipe benders/suppliers.
 

Attachments

  • car seat.jpg
    car seat.jpg
    77.9 KB · Views: 140
  • measurements.jpg
    measurements.jpg
    29.6 KB · Views: 72
Last edited:
There is something fun about head to head racing with a bunch of mates and a fist full of beers, and is something that the online game will ultimately remove altogether... but for now, this is how my loungeroom looks :)
(Second wheel not on display)
Probably for the purpose of giving virtual ride-alongs to those interested in watching you race, I bet. Good job on your rig.;)👍
 
Probably for the purpose of giving virtual ride-alongs to those interested in watching you race, I bet.
The wife would have none of that... second wheel was at the Father-in-laws as the second seat was built for him. But until he finds a way he is "comfortable" telling his woman what he has just acquired, his seat lives at my place and Wednesdays become race days for the next week or so.

me - "So does your woman know you asked me to build this for you?"
F-I-L- " Ummm no.....no she doesnt "
me - "Right... ummm how are you going to hide this in your house then?"
F-I-L - "I dont know.. I think I will get you to drop it around when she is out and I will say look what Ben built for me.. I just wont tell her I paid for it. That way its already here and she cannot tell me it has to stay at Bens house."
me - "Good plan!"
 
Personally I think the F1 style cockpit where you are pretty much on the floor is the best way to go, looking at your thread 888, has inspired me to start building my own. It will take time but hey, that's the coolest thing in the world, cause when it's finished you know it that you did. :P
 
Personally I think the F1 style cockpit where you are pretty much on the floor is the best way to go, looking at your thread 888, has inspired me to start building my own. It will take time but hey, that's the coolest thing in the world, cause when it's finished you know it that you did. :P

+1.. that is what its all about
 
Personally I think the F1 style cockpit where you are pretty much on the floor is the best way to go, looking at your thread 888, has inspired me to start building my own. It will take time but hey, that's the coolest thing in the world, cause when it's finished you know it that you did. :P

For TV use, yes I agree, the lower the better.

For PC gaming where you're working with a 30" tall desk....Not so good. I have my seat lowered all the way down and that's only so my knees clear the steering wheel...
 
You adjust it to at what level your monitor are at. You don´t want to twist your neck unnaturally. If anything you would want to twist it down rather then up.

As for looking up it´s mentioned to close your tear channels making your eyes all dry. I recently changed my speaker setup so I had the monitor on my center speaker. I have a reclinable seat so it does work. But noticed I got dry eyes and then someone mentioned that. So well monitor about level with your eyes works best for me.
 
Back