TS-PC struggles to finish startup calibration.

  • Thread starter EpEpDono
  • 32 comments
  • 2,833 views
18
South Africa
South Africa
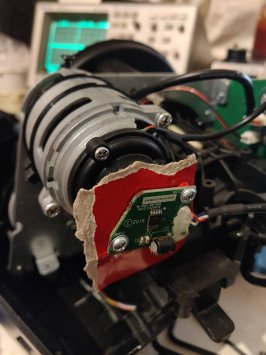
So I bought two TS-PC servo bases for chips, but they both have startup calibration issues, both start up and spin left to right a couple times, same fast speed both ways, and then tries to center, usually they miss the center, after which its back to spinning left and right. One of the bases has managed to finish calibration twice, after I fiddled with the Hall effect sensor, but seems like the calibration was off somehow, I then turned the wheel all the way clockwise and it rapidly spun all the way back counterclockwise, after which it seems the calibration was perfect, and FFB seems to work from the control panel . But when powering on the next time it struggles to calibrate again. It often times returns to dead center, but then starts spinning again...

I have read that the T300 sometimes has a issue where the rotor loosens from the shaft, but in those cases the spin in one direction is usually slower than the other? I also found that Angle Motor Calibration tool and tried to run it, but it does not seem to even detect the bases, does it only work on the T300? Any idea what the issue could be? Firmware and drivers are fine.

Also, does anyone know the significance of the line on the driving cog? I assume its supposed to be aligned with the steering wheel at center?
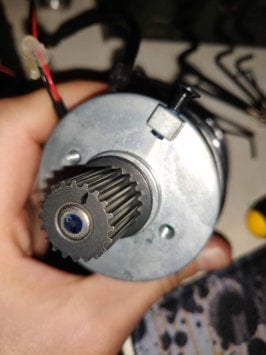
cog_line.jpeg
 
Ok, I think I have found a way to get this thing to calibrate somewhat reliably, I put this piece of cardboard under the Hall sensor to push it up from the fastener, and during the calibration, which is still very violent and strikes the stops more than twice, I move the sensor around a little, then after three of four strikes it calibrates. Could the magnetic field have changed over time? Maybe a good idea to swap out the magnet and see if that fixes it? Anyone know what strength this magnet is supposed to be?
hall_spacer.jpeg
 
A little bit more progress, If I position the sensor just right using that bit of cardboard, which seems to be rotated slightly from the plastic mounts, then it calibrates pretty much perfectly and does not slam into the stops at mach speed. I guess this means that the sensor magnet or motor core magnet is slightly rotated? The sensor magnet mount looks and feels very solid, so idk how that could have rotated...
 
I played around with it a bit more and it seems like the FFB is much stronger and faster in the counter clockwise direction so I guess that's a core that's rotated on the shaft...
 
A little bit more progress, If I position the sensor just right using that bit of cardboard, which seems to be rotated slightly from the plastic mounts, then it calibrates pretty much perfectly and does not slam into the stops at mach speed. I guess this means that the sensor magnet or motor core magnet is slightly rotated? The sensor magnet mount looks and feels very solid, so idk how that could have rotated...
Replying to this as I am currently having a similar issue with the ts-xw base. So the mount and the position of the sensor is responsible for this issue if I am not mistaken?

Did you find any permanent solution to this?
 
Last edited:
Yes, so the root of the problem is that the magnetic core of the motor has shifted relative to the HALL encoding sensor, so now the motor controllers calibration is incorrect. You can easily verify this by unscrewing the HALL effect sensor (That thing that I stuffed the red cardboard under) and slightly rotating it to one side or the other, take care to keep it centered otherwise the motor will start rattling. Once you have it in the right orientation the motor should work perfectly, and, importantly have equal ffb in both directions.

In terms of fixing it, there is a re-calibration tool floating around specifically made for this, but for the T300, and I have been unable to get it to work with the TS-PC.

So other than that fix 1: That the easiest way would be to unscrew the black plastic sensor mount and rotate the little sensor magnet attached to the shaft, just pry off the plastic mount glued to the shaft and rotate, the glue should not be very strong. Rotate it into the correct orientation that the motor functions properly and fasten it somehow. It does not need to be very well fastened as this part does not carry any load at all.

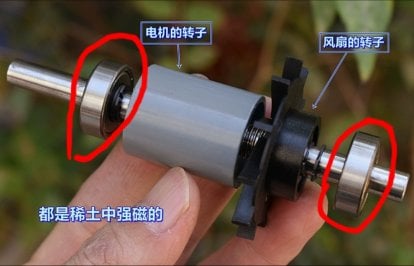
However there is a very real possibility that the magnetic core will rotate again under heavy load, so fix 2: Bit more difficult, but doable, disassemble the motor from the sensor side, you will have to remove the bearings which are secured with snap rings, so you will need some snap ring pliers or something similar. Disassemble until you reach the magnetic core and then glue it with epoxy or some similarly strong gule. Then do fix 1.

That should work fine, but ideally you want to completely remove the core such that you can glue it properly from both sides and internally, but that is a massive pain in this motor because to remove the core you need to completely remove the metal pinion gear, which is press fitted onto the shaft. I have been unsuccessful in removing it, it's really tight, I suspect you might have to cut it off and install a replacement.

I would start with just fix 1 and if it acts up again do fix 2 as well. Removing the pinion gear is not worth it unless someone knows a better way to get if off.
 
Hi so yeah I have attempted to position the Halling sensor correctly in front of the magnet but now instead of the wheel just being stuck to the left during calibration, it now slowly goes to the right on startup and violently returns to the left striking steering lock twice. Thinking of having another go as I probably need to try a different position but I was also considering just replacing the motor outright as that seems much more manageable. I've seen others replace their motors for other reasons such as loss of ffb but in this case I don't know if it may cause further issue with calibration.
 
Yeah, that means you turned it too far or in the wrong direction, if its off center with the core its gonna turn faster in one direction vs the other. It's a 3 phase motor with 3 poles per phase, at MOST you would need to rotate it by 20 degrees one way or the other, but more likely less than that, I think mine was about 10 degrees. The way I did it is to slightly rotate it during calibration until the motor stabilizes, you should get it to calibrate quite easily doing that. Then using the open ocean FFB test from the control panel you can fine tune it until the wheel rotates equally in both directions.

Replacing the motor is the easiest option, I don't know if they calibrated all the motors to the same orientation or if its done on a per motor basis. So the calibration might still be out if its on a per motor basis. But then you just rotate the sensing magnet until it's in the right orientation, as I said in 1.

If the motors didn't cost 4x to ship to me, and it broke again after I adjusted the magnet, I would probably replace it. If shipping is not an issue they're quite cheap. You can search for B5665 motor, there are some on eBay and Alibaba.
 
Last edited:
Yeah, that means you turned it too far or in the wrong direction, if its off center with the core its gonna turn faster in one direction vs the other. It's a 3 phase motor with 3 poles per phase, at MOST you would need to rotate it by 20 degrees one way or the other, but more likely less than that, I think mine was about 10 degrees. The way I did it is to slightly rotate it during calibration until the motor stabilizes, you should get it to calibrate quite easily doing that. Then using the open ocean FFB test from the control panel you can fine tune it until the wheel rotates equally in both directions.

Replacing the motor is the easiest option, I don't know if they calibrated all the motors to the same orientation or if its done on a per motor basis. So the calibration might still be out if its on a per motor basis. But then you just rotate the sensing magnet until it's in the right orientation, as I said in 1.

If the motors didn't cost 4x to ship to me, and it broke again after I adjusted the magnet, I would probably replace it. If shipping is not an issue they're quite cheap. You can search for B5665 motor, there are some on eBay and Alibaba.
OK so, just wanted to give a quick update. I appreciate you for your help, although I haven't resolved the issue yet, I have been able to get a good idea for what exactly is going.

So basically I messed around the with the Halling sensors position for the past couple of days and even tested with a piece of cardboard to adjust the angle like you had done. Nothing really changed apart from when putting It in a certain position the calibration would strike left rotation twice very hard. The other behaviour I noticed is when screwing the Halling sensor back on it would start up the calibration normally but only go to the left and struggles to rotate to the right causing this endless back and forth from the left stop. When I turn the wheel manually to the right and center it, it actually calibrated but force feedback was stronger on the left than the right which lead me to think that the sensor is actually centered with the magnet but the magnet itself is tilted slightly more to the left and the right base cannot self rotate to right and complete start up calibration as the sensor is too far from the permanent magnet on the right side.

From my understanding there is two magnets, the sensor magnet and the permanent magnet correct? So if that's the case I think the sensor magnet is just tilted from the permanent magnet and is causing weak connection on the right side.

In theory if I replace the motor it should be able to complete the start up calibration as soon as I power it on but may be out of alignment due to the orientation of the magnet like you said.
 
That means that the sensor magnet is misaligned with the core magnet, so you should be able to rotate the sensor magnet (or the sensor itself just in the opposite direction) to account for that. The reason the startup calibration doesn't work properly is due to this misalignment, so if you get a new motor and the motor's calibration is different than what is saved on you controller (which I'm not sure if it is) then you'll still have to fix the sensor magnet's orientation. The core magnet of the new motor would just be glued properly so it won't come loose again.

If you want I could take a video on how I rotated to sensor to make it work, when I get a chance.
Yes if you could demonstrate how you did it that would very helpful thanks.
 
Sorry to bother again but I've ended up buying a replacement motor and it's currently on the way. I've verified its the exact same motor but there is only one difference. It does not have the plastic piece attached to the sensor magnet as you can see here:

Screenshot_20240621-114447_AliExpress.jpg


Compared to with it on for example (not the same motor but demonstrates the same thing):

Screenshot_20240621-114555_YouTube.jpg


do you think this will be an issue to have it without or does it not affect anything?
 
Took a while but I finally got around to making a video: .
The base I'm showing is already partially fixed, I already rotates the sensor magnet a little so its not as bad as it was initially (rapidly slamming both stops). But it should illustrate the concept.

You can just use the sensor mount from your old motor. If its the same one you can just screw it onto the new one. I assume the new motor does not have the sensor magnet either? You can also use the one from the old motor.
 
Last edited:
Oh wait are you talking about the sensor mount:
1718970038666.png

or the sensor magnet mount?
1718970011234.png

Either way you can reuse both, just pry off the sensor magnet mount with a screwdriver or a knife or something, the glue should not be that strong. You will ofc have to align the sensor magnet properly as we discussed.

But yes, the I don't think the plastic piece is really required, you could just glue the magnet onto the shaft. I would probably reuse the magnet from the old motor, this ensures that the magnet is centered on the shaft, which is very important, otherwise the motor will rumble, jitter or whatever you wanna call it.
 
Last edited:
OK so just replaced the motor and I guess its like you said. Its rattling.


I don't think there is any to point to this replacement since I will need to adjust the magnet centered correctly either way. Aren't I essentially doing what I would have done with the original motor.
 
Last edited:
Yes, its as I said previously. The point to the motor replacement is that with the new motor the motor core magnet is properly connected to the shaft, so it won't slip again. But you still need to dial in the sensor magnet for it to work.

Edit: You did add the magnet to the back shaft of the motor right? That rattling is to the extreme that it looks like the HALL sensor is not detecting a magnetic field. If you did not mount the magnet the HALL sensor is just going to pick up noise and send rubbish positional data to the control board, thus it will just rattle like that.

Like this magnet:
1719241356481.png
 
Last edited:
Yes, its as I said previously. The point to the motor replacement is that with the new motor the motor core magnet is properly connected to the shaft, so it won't slip again. But you still need to dial in the sensor magnet for it to work.

Edit: You did add the magnet to the back shaft of the motor right? That rattling is to the extreme that it looks like the HALL sensor is not detecting a magnetic field. If you did not mount the magnet the HALL sensor is just going to pick up noise and send rubbish positional data to the control board, thus it will just rattle like that.

Like this magnet:
View attachment 1367381
No so I just installed the replacement as It was. Of course I kept in my mind what you had mentioned earlier about using the old sensor magnet and gluing it to the shaft so this outcome was somewhat to be expected.

I did not attach the sensor magnet mount from the old motor either. So from here I will look to inserting the old sensor magnet and attaching the mount.
 
Ok, until you get the right rotation of the sensor magnet I would not glue it, if you pry the magnet off the old shaft with its plastic holder attacked you should be able to slide it over the new one and it should sit quite snug, otherwise stick it with prestic or something. Only glue it more permanently once you fine tuned its rotation.
 
Yes, its as I said previously. The point to the motor replacement is that with the new motor the motor core magnet is properly connected to the shaft, so it won't slip again. But you still need to dial in the sensor magnet for it to work.

Edit: You did add the magnet to the back shaft of the motor right? That rattling is to the extreme that it looks like the HALL sensor is not detecting a magnetic field. If you did not mount the magnet the HALL sensor is just going to pick up noise and send rubbish positional data to the control board, thus it will just rattle like that.

Like this magnet:
View attachment 1367381
Just one question about your reply. By mounting the magnet, do you mean attaching the plastic mount piece onto the sensor magnet or mounting the old sensor magnet in the place of the new motors magnet as I recall you said the sensor magnet mount isn't required. Just a little unsure by what was meant.
 
So the new motor did not come with this right? So just pry this whole plastic part off the old motor shaft, I used a bayonet, and install it on the new one. And rotate it such that its calibrated properly.
1719250539869.png
 
So the new motor did not come with this right? So just pry this whole plastic part off the old motor shaft, I used a bayonet, and install it on the new one. And rotate it such that its calibrated properly.
View attachment 1367399
Exactly it didn't come with that piece attached to the sensor magnet and I installed it that way. So as you've suggested to pry it off the old shaft and attach to the new one, the shaft is what the piece attached to so I don't need to switch out the sensor magnet in other words?
 
You don't need a new magnet no, you just take the whole plastic piece, with the magnet attached, and slide it onto the new motor's
So i should revert back to the old magnet for the new motor instead of using the magnet that came with it. Ok just got confused since you said to pry of the plastic piece attached to the shaft then apply the piece onto the new so I assumed the magnet to be the shaft. Sorry I'm not too familiar with what is what in these motors.
 
Last edited:
So the two outlined pieces are the magnets and the rod that goes through them and what the plastic piece attaches to is the shaft?
If so then man i feel very stupid and I apologise for constantly bothering you regarding this.
Screenshot_20240624-205549_AliExpress.jpg
 

Attachments

  • Screenshot_20240624-205549_AliExpress.jpg
    Screenshot_20240624-205549_AliExpress.jpg
    100.5 KB · Views: 6
Last edited:
Ok so this little piece here is the sensor magnet that is attached to the shaft and not actually the shaft itself because that is what I was thinking initially
20240624_215520.jpg
 
Last edited:
Ive now just realised there isn't a sensor magnet at the end of the replacement motor at all so no wonder the Halling sensor was not picking up a magnetic field.

Screenshot_20240624-220256_AliExpress.jpg

As seen here I'm sure that's just the shaft right? I'm now only just realising upon discovering that the sensor magnet is the little piece at the tip of the shaft. Well I will go ahead then with getting this old magnet onto the new motor. I see what you were trying to explain earlier.
 
Last edited:
Back