Building my custom man cave and simulator

  • Thread starter Henry III
  • 37 comments
  • 15,387 views
38
South Africa
Cape Town
EDIT: 21 September 2014

Changed the title of the thread, because my rig project is morphing into a full-blown man cave project.


_____________________________________________________________________


Hi Guys.

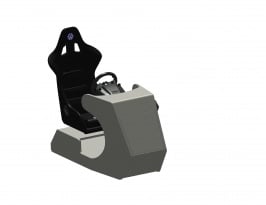
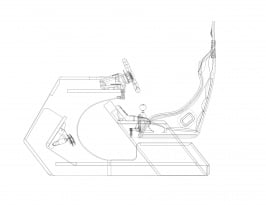
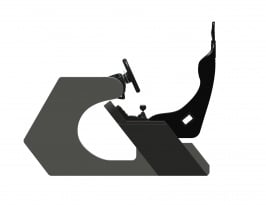
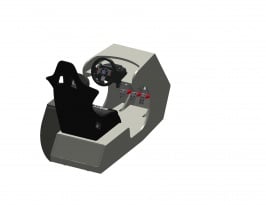
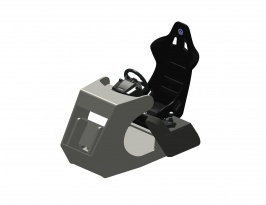
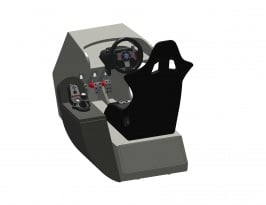
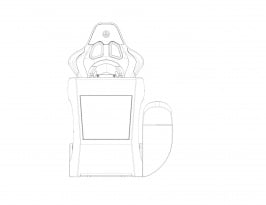
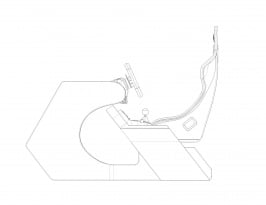
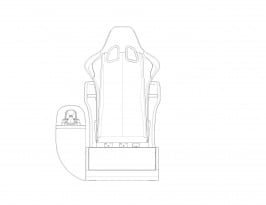
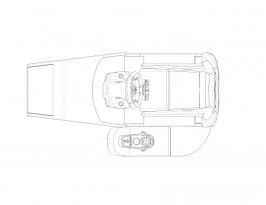
I am midway through designing my very first rig. (see pics below) The plan is to machine all the parts from 22mm Mdf for an accurate rig. Rig is based on pictures I saw of Ricmotech RS1 and YSR simrig. I wanted to put my own touch on it, so I started with dimensions of my everyday car for positions etc and started playing with the "look" I wanted from there. I downloaded 3d models of the G27 gear and the seat.
The "real" seat and G27 gear should arrive by the end of the week.

The "lid" part in which the G27 shifter is mounted can be removed from the base and be replaced with a "lid" made for whatever shifter i get in the future. I plan to reverse mount the pedals.

I would really appreciate any comments and advice on the look and functionality so far. Also keep in mind that I would want to upgrade the wheel, pedals and shifter in the future, but keep the same rig. Please do not hesitate to say what you would do different to perhaps make it more functional or look better. It is important to me that it must look "professional" and be functional and adaptable to future hardware upgrades, so all comments are welcome and please don't hold back. Be critical and say what you think.

Thanks in advance
 

Attachments

  • rev1_iso5.jpg
    rev1_iso5.jpg
    68.2 KB · Views: 523
  • rev1_sideview_wireframe.jpg
    rev1_sideview_wireframe.jpg
    194.6 KB · Views: 635
  • rev1_iso4.jpg
    rev1_iso4.jpg
    67.1 KB · Views: 500
  • rev1_iso3.jpg
    rev1_iso3.jpg
    82.6 KB · Views: 483
  • rev1_iso2.jpg
    rev1_iso2.jpg
    80.9 KB · Views: 478
  • rev1_iso1.jpg
    rev1_iso1.jpg
    96.9 KB · Views: 488
  • rev1_frontview.jpg
    rev1_frontview.jpg
    107.2 KB · Views: 488
  • rev1_sideview.jpg
    rev1_sideview.jpg
    119.2 KB · Views: 516
  • rev1_rearview.jpg
    rev1_rearview.jpg
    110.5 KB · Views: 473
  • rev1_topview.jpg
    rev1_topview.jpg
    150.4 KB · Views: 495
Last edited:
A very sleek and modern design you've got there! The only things I would add are a cupholder, mobile phone holder and (if you intend to use it with PC) keyboard stand. You said about changing lids to fit shifters but would it be possible to retrospectively extend the shifter support upwards to allow room If button box or tablet integration ever catch your fancy? It's definitely not something you need to worry about yet, but if you want this to be future proof it may be worth considering allowing the space from the get go.

I designed my cockpit on the computer too and I'm looking forward to seeing your rig step from virtual to reality! 👍
 
I really like the design and as stated above , a keyboard holder is something you can think about , even if you use only for your smartphone , gloves , headset or something like that.
one advise maybe :
add some adjustability in the wheelbase and the pedalset + the seat.
the wheel angle is pretty high imo.
for the seat mount you can use something like this.

image.jpg


keep us informated mate :cheers:
 
Hayden and King, thank you very much for your comments and advice. It is appreciated.

@Hayden , regarding

cup-holder - Nice idea, it should be easy to insert in current structure without visually standing out
mobile phone holder - similar to the type that I have seen where you can get game related information from?
keyboard stand - I mostly play GT on PS3, but I will see how I can make this work visually without looking like an afterthought. Maybe a tray that pulls out from under the wheelbase?
extending the shifter support upwards - Really like this idea! I haven't thought about that and it would be easy enough to make the extending part hollow with an access cover from the back. I haven't used a button-box, what are typical functions for the buttons in a separate box. On that note, is it worth it to consider a dashboard?

@KingKlingeling , regarding

Adjust ability - Looking at it again, I agree, the angle of the wheel may be too high. I will have to think of a clever way to make it adjustable without any movement at all when locked in position. Or, do a dry-run before bonding the wheelbase support in the correct position. Same for the pedals, seat and shifter housing. I have watched close to 40 reviews of different simrigs on YouTube and the one thing that would annoy me the most is any kind of movement or play between components. It has to be absolutely rigid. Do you think only the angle must be adjustable for the wheelbase or for/aft also?
Seatmount - nice, solid bracket with enough adjust ability. I will have to see what comes with the seat when it arrives and take it from there.


Thank you, you have given me solid ideas to work with. I will also start work on freestanding monitor mounts. Any thoughts?

Anything I should keep in mind for future buttkicker mounts?
Please feel free to add any thoughts or criticism. :cheers:
 
a dry run is the best you can do , nothing sucks more then to invest endless hours assembling until you find out you're not sitting comfortable.
about the rigidity: the most important thing , I've tried countless rigs until I found my actual and even this needed some extra welding.
do you think about single or triple screen ?
I just start a quick search and edit my post with some Ideas :cheers:

edit :

image.jpg
image.jpg

image.jpg


I'm currently looking for some proper stand for myself and I'll let you know if I got some news .
 
Last edited:
a dry run is the best you can do , nothing sucks more then to invest endless hours assembling until you find out you're not sitting comfortable.
about the rigidity: the most important thing , I've tried countless rigs until I found my actual and even this needed some extra welding.
do you think about single or triple screen ?
I just start a quick search and edit my post with some Ideas :cheers:

edit :

View attachment 212151 View attachment 212152
View attachment 212153

I'm currently looking for some proper stand for myself and I'll let you know if I got some news .


Thank you for the pics. At present I play with a single monitor, but I want the monitor stand to be able to easily upgrade to accomodate triple screens.

About the rigidity. 22mm mdf is very robust and when screwed + bonded at right angles, should be very rigid. As with welding steel, it should be very easy to see where extra rigidity is needed and bond another triangle in to reinforce a panel. I can even go up to 32mm mdf, but I think it would be very heavy and maybe not look as sleek
 
Henry, it looks very good mate. I suggest mounting the seat slightly reclined. Straight mount won't work properly, it will be uncomfortable. If you are not going to have adjustability for reclining, take measurements from your car and match the angle, but using rails is a must.
 
Ergonomics seem to be well covered. Looks-wise, feel free to steal any ides from mine if you haven't seen the build and you like it:

https://www.gtplanet.net/forum/threads/r-pod-mkii-custom-rig-build-video-tour-added.306220/

Wow Eric. You managed to build a fantastic rig there. Well done. Thanks for pointing me to your thread.
I like the double laminated features on the panels, and the shape of your shifter pod. The idea with my shifter pod, if I may borrow your term, is to have the volume underneath large enough to only have to replace the lid if I ever get my hands on a Fanatec shifter like you have there. Would it be possible to pass on the dimensions of the fanatec shifter unit?

Another question : How was the rigidity after the internal structure was glued together?

How long did it take you from start to finish? Good job man, inspiring to see what is possible.
 
a dry run is the best you can do , nothing sucks more then to invest endless hours assembling until you find out you're not sitting comfortable.
about the rigidity: the most important thing , I've tried countless rigs until I found my actual and even this needed some extra welding.
do you think about single or triple screen ?
I just start a quick search and edit my post with some Ideas :cheers:

edit :

View attachment 212151 View attachment 212152
View attachment 212153

I'm currently looking for some proper stand for myself and I'll let you know if I got some news .
I made mine out of 80/20 extruded aluminum. It cost about the same as a pre made triple monitor stand, but I was able to design it to fit my needs exactly as my monitors have no vesa mounts. It looks a lot like the first one you posted, sorry no pics, and when I need to upgrade monitors Ill have no issues adapting it to work with them. I think all together it was between $250 and $280 depending on parts you decide to use.
 
Thanks Henry. The dimensions for the shifter can be found here (including the height):

http://www.fanatec.com/download/CSS-CSSSQ_DrillingTemplate.pdf

Rigidity is very good although I did use wood strips and screws to assemble everything. The side panels also add a little extra strength. I was surprised that I did have more flex than desired on the shelf supporting the wheel (not the stem) until I used 2 pieces of MDF in that area. All is good now.

I started the build on the 9th Feb this year and finally completed the dash on July 20th. Estimated build time was somewhere in the region of 350 hours :)

I will be going triples at some point and will build the mount into the top of the dash; I want something which looks completely integrated. Maybe it's not as versatile as a separate mount but I'll make sure I get it right to begin with!

Good luck with your build :cheers:

Edit: this looks like a good monitor stand to integrate with a rig:

http://www.fasttracksims.com/triple-monitor-mount-1/
 
Last edited:
Thank you for everyone's input so far.
I have done a lot of reading up on automotive ergonomics the past 2 days, so have not spent any time on the actual design since revision 1. I wish I could just spend all my time on that right now, but my actual job needs some serious attention the next 2 days. Will see if I can work on the design on the weekend and have something to present next week. Also might help if I receive the actual hardware (seat and G27 gear) before the weekend.
In the meantime, keep the ideas coming, I really appreciate your effort.
 
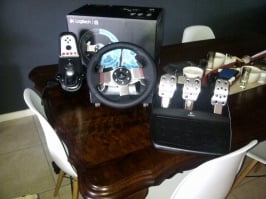
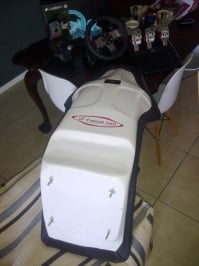
Just a quick update. The G27 gear and seat arrived today after the shipping company "lost" it for 2 days.
I aced GT5 with the DS3 controller, so can't wait to start playing GT6 with a wheel.
The seat feels a bit flimsy, almost like the fibreglass is too thin. Bit disapointed with that, but I've decided to strip the seat upholstery in any case to spray the backshell matt-black. So all I have to do is reinforce the inside with fibre glass and nomex honeycomb core. It did noy come with rails, so I will have to incorporate that too. Any ideas welcome regarding seatrails.

I did spend some time with the rig model over the weekend too, but not quite finished with revision 2.
It now has a keyboard tray, wheelbase adjustability and adjustability for the pedals. Will post pics as soon as I am happy with it. It took quite a bit head scratching to build adjustability into the design and still keep rigidity as a top priority. Also updated internal rigidity and sent it off to an engineer friend for FEM analysis on the structure. Also waiting for his recomendation before uploading revision 2 pics.

Anyway, thanks for eveyones' input so far. Please give ideas regarding seatrails, now that you have seen what the seatbase looks like.
 

Attachments

  • IMG-20140902-00416.jpg
    IMG-20140902-00416.jpg
    505.8 KB · Views: 94
  • IMG-20140902-00417.jpg
    IMG-20140902-00417.jpg
    92.6 KB · Views: 97
  • IMG-20140902-00418.jpg
    IMG-20140902-00418.jpg
    70.1 KB · Views: 93
Henry unless you spend BIG $$ on a FIA approved Name brand (Sparco, Recaro, ect ect which is OVERKILL for sim racing) Your going to find that most of the cheapo seats online or with NO certification will be a thinner glass bucket.
 
Yeah Nick you are right, I should have known :)
Luckily for me not too much hassle to beef it up a little. It just has too much sideways torsion. Really, I think 2 layers extra glass and it would have been fine.
 
Often thought of doing the same with mine but it hasn't proved a problem, Just One tip be careful removing/re installing the fabric cover, they can be a little tricky at times.
 
Just a quick update. I am still far from ready to start manufacturing, but have spent a lot of time working on the model. I have now integrated the Fanatec CSW to the model. I tried Thrustmaster wheels, but they are so big and bulky, so have put that on hold for now.

Changes from revision 1 to revision 2:
1 -Overall the shape changed quite a bit to accommodate all versions of pedals from all 3 major manufacturers - pedal area is still very "agricultural" and needs alot of refinement for both floor mounted pedals and inverted mounted pedals with adjustable rake and for/aft adjustment

2- Wheel mounting plate rake is now adjustable and can accommodate G27 and Clubsport Wheels. The net result is about 100 mm up and down adjustment measured from floor to centre of the wheel and can be locked in position exactly at the rake i want. No increments as I have for the inverted mounted pedal plate.

3- Keyboard tray has been added. It slides out from underneath the wheel and is packaged so that when it is pushed in it will not interfere with my legs. It took me hours to get it to fall inside the profile of a normal modern car's dashboard typically underneath the steering wheel. When it is extended it molds around my body and gives support for my forearms to rest on while typing.

4- Electronics compartment has been added, accessed from the front by removing the "bonnet". Typical stuff to mount here are power supply, butt kicker amplifier or usb hub etc. For instance, I am still working on integrated cooling to extract warm air around the wheelbase and that will need a power supply.

5- Button boxes has been added either side on the dashboard. At the moment it is just a removable face plate covering a cavity with ducting running through to the electronics compartment. Basically when I want to start using button boxes I can just mount the buttons on the face plate. There is enough room for the electronics to be safely out of the way of any moving parts inside the rig.

Still on the to-do list:
1- Integrated cooling to extract warm air around the wheelbase
2- Refine pedal area - adjustablilty etc.
3- Seat mounting points and adjustability
4- Gear mount assembly needs a lot of attention. I want to integrate a handbrake here and a cup holder and the fanatec and thrustmaster gear shifters.
5- Independent monitor stand for triple monitors
6- Overall structural stability needs a lot of attention, especially under the floor.

G27 Wheel at minimum rake
01_rev2_G27_steering_min_rake.jpg
G27 Wheel at maximum rake
02_rev2_g27_steering_max_rake.jpg

CSW at minimum rake
03_rev2_CSW_steering_min_rake.jpg

CSW at maximum rake
04_rev2_CSW_steering_max_rake.jpg

CSW with keyboard Extended
05_rev2_csw_keyboard_extended.jpg

Keyboard extended - Isometric view
06rev2_keyboard_ext_iso.jpg

Keyboard pushed in - isometric view (notice button boxes either side of wheel)

07_rev2_keyboard_int_iso.jpg

Electronics compartment
08_rev2_electronics_comp.jpg


Thank you for reading through this post and giving me some ideas. It is much appreciated and as usual I ask for you critical input.
 
Last edited:
I personally think that a "comfortable" height on the steering wheel might not allow that Keyboard tray to function as you would like it to. I Also tried to make a "Under the wheel" keyboard mount and ended up going a completely different route with an Articulating mount off to the side. Nice thing was it gave the idea for the same style Mount pad.
 
I personally think that a "comfortable" height on the steering wheel might not allow that Keyboard tray to function as you would like it to. I Also tried to make a "Under the wheel" keyboard mount and ended up going a completely different route with an Articulating mount off to the side. Nice thing was it gave the idea for the same style Mount pad.

I spent so much time to get the keyboard tray in the "correct" position I will have to physically try it out at least :)
It is an add-on feature and adjustable vertically and wont affect anything else if it does not work and I throw it out.

My software has a manikin (mannequin) package, but I don't have a license for it. It would be nice to have because this rig design is the perfect exercise for it. Anyhow, thanks for the input Nick, appreciated.
 
Nick, I think you are right. I modeled a manikin and you can see the results below. Pull-out keyboard tray was a grand idea, but it does seem impractical :)
At least now that I have the manikin I can adjust everything else more accurately.
rev2_keyboard.jpg
 
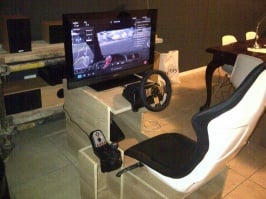
Another update: I built a mock-up of the rig last Monday to test my dimensions and structural strength.
I learned 3 things:
The structure it is a bit small. I can fit, but my friend is 6"3 and he is way too tall for it.
The structure is super rigid. There is no movement, like in none, zero vibration. I am so happy with that :)
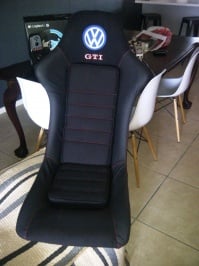
The bucket seat is a bit flimsy and since it is non-recline I am not too happy with the angle. It also does not have sliders so my friend could not get in at all.
So, on Wednesday I went to buy proper car racing seats with sliders. I also went to a supplier of composite materials and got some samples to test. I decided to build "the rig" from composites. I found the mdf to be too heavy for my liking.

Mock - up 1

IMG-20140916-00435.jpg


I had to take the mock-up back to my workshop for changes and to fit the new seat.
I have a little corner at work where I keep stuff that I don't want to keep at home, but there is a lot of dust, so I decided that I need a dust-free area.

Mock- up 1 - under covers

DSCN4934.JPG


Laying down the grid for the floor

DSCN4941.JPG


Putting down floor boards, obviously I had a beer or three while doing the floor :)

DSCN4942.JPG


Floor Done!

DSCN4943.JPG


Got some guys in this morning to build the walls

DSCN4944.JPG


Going to need some ventilation

DSCN4948.JPG


DSCN4949.JPG


DSCN4951.JPG


Installed some fans to pull out hot air and create positive air pressure to keep out dust

DSCN4956.JPG


While the guys were busy with walls I decided to spray the covers of the extractor fans

DSCN4953.JPG


DSCN4954.JPG


They are busy putting in the ceiling as I'm typing this

DSCN4963.JPG


Tomorrow they will finish the outside walls and skim all the joints and make it "nice"

To be continued...


Attachments

  • IMG-20140916-00435.jpg
    IMG-20140916-00435.jpg
    120.2 KB · Views: 15
Last edited:
The guys helped me to push mock-up 1 into the booth.

DSCN4976.JPG


There is enough room for another rig and triple monitors

DSCN4977.JPG


I had to put a ups between plug point and rig. My factory electricity is a bit "dirty" and we get "spikes" every now and then when we start a machine.


DSCN4978.JPG


I just had that itch that I wanted to drive it in there right now. I'm sure you know the feeling.:) The extraction works like a charm. I put up a board from outside and it sucks it onto the frame, so the doors with proper seals and rebates will work too.

I can't wait to get all my cabinets and tools inside. First needs painting, doors and a floor covering, so mock-up 1 will probably go under covers again tomorrow.

We have a busy week ahead, so I doubt much will happen this week. I can maybe put one of my guys on painting and doors, but I would like to do that myself.

I'm very chuffed with my "development room" :lol:
Last time a had a development room was 8 years ago at my previous job, and ever since I started working for myself I never had time for messing around in my own little cave.

As usual, please let me know your ideas what you would have done to the room.
 
Looks like you can fit in more A) monitors and B) racing seats ;) Excellent cave so far man, keep it up!


Jerome
 
I boarded up the entrance yesterday. I find myself sitting in the chair, firing it up and 3 hours goes buy without doing any real work:lol:

I'm having a crunch week at work and going away for the weekend. Next week I'll be "out of the trouble" with work and will have much more time to spend on the cave.

Thank you for the kind comments.
 
Back