- 5,842
- Forgotten Wing
Ok, I've noticed that alot of the people new to photoshopping lack the basic skill of creating a carbon-fiber simulation. Here is my method for this manipulation:
(please note that any copying directly from this tutorial will be reported, so I'd recommend against it...)
Step 1
Open the picture you want to add carbon-fiber to. This is the picture that I will be using in the tutorial:

Step 2
Now, select the part you want to remake out of carbon-fiber with the polygon lasso tool. I'm carbon-fiber-ing the hood of this car:

Step 3
Hit Ctrl+C then Ctrl+V to make a new layer. Then, desaturate that layer using Ctrl+Shift+U:

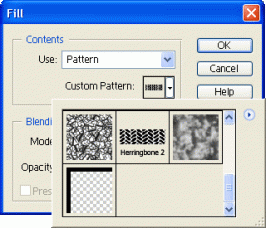
Step 4
Now, open a new picture, size 1024x768, and go to Edit>Fill>Pattern>Herringbone 2*. Then go to Filter>Distort>Twirl and make it a 50-degree turn as shown (it will be much larger):

*Herringbone 2 may be exchanged for another pattern. I find that it is the best one out there, but that is my opinion. Feel free to experiment as allowed.
Step 5
Now, copy and paste the Herringbone-filled and twirled 1024x768 image into your picture, and distort it until it fits in what I call the "Median Plane" of the part you are remaking in carbon-fiber (see picture if you don't get it):

Step 6
Go into the layers Pallet, hold Ctrl, and click on the desaturated-hood layer to select that layers edges in the carbon-fiber layer (cf layer must be highlighted as shown in the picture). Cut and paste this onto a new layer, and delete the old cf layer.

Step 7
Now, in the layer-blending modes, select overlay or multiply on the carbon-fiber layer. This should give you a good effect, but to make it look better, mess around with the brightness and contrast levels. Heres how mine turned out:

(please note that any copying directly from this tutorial will be reported, so I'd recommend against it...)
Step 1
Open the picture you want to add carbon-fiber to. This is the picture that I will be using in the tutorial:
Step 2
Now, select the part you want to remake out of carbon-fiber with the polygon lasso tool. I'm carbon-fiber-ing the hood of this car:
Step 3
Hit Ctrl+C then Ctrl+V to make a new layer. Then, desaturate that layer using Ctrl+Shift+U:
Step 4
Now, open a new picture, size 1024x768, and go to Edit>Fill>Pattern>Herringbone 2*. Then go to Filter>Distort>Twirl and make it a 50-degree turn as shown (it will be much larger):
*Herringbone 2 may be exchanged for another pattern. I find that it is the best one out there, but that is my opinion. Feel free to experiment as allowed.
Step 5
Now, copy and paste the Herringbone-filled and twirled 1024x768 image into your picture, and distort it until it fits in what I call the "Median Plane" of the part you are remaking in carbon-fiber (see picture if you don't get it):
Step 6
Go into the layers Pallet, hold Ctrl, and click on the desaturated-hood layer to select that layers edges in the carbon-fiber layer (cf layer must be highlighted as shown in the picture). Cut and paste this onto a new layer, and delete the old cf layer.
Step 7
Now, in the layer-blending modes, select overlay or multiply on the carbon-fiber layer. This should give you a good effect, but to make it look better, mess around with the brightness and contrast levels. Heres how mine turned out:
")

 )
)