Modified Track Path Editor + Tracks/Discussion

Here's a track I made with 1.1.0, which was enough to get me where I wanted for that one. It's a mashup of corners from various real circuits.

Main straight 1km
Copse
Corkscrew - Rainey curve
Senna S - Curva do sol (mirrored)
Pouhon (mirrored) into 200R - Spoon (I'm in love with how that section flows)
Tsukuba last corner
Schumacher S (mirrored)
Porsche curves (mirrored)
Autopolis 85R

https://www.gran-turismo.com/fr/gt6/user/#!/friend/GT-Alex74/course/2574909/

------------------------------

A point to point track combining two pieces of road I like and drive quite often in real life (especially first part, lived right at the bottom of that moutain pass for several years, and before I had my licence, I'd ask friends to call me an hour before if they were planning to drive there so I could get at the top and wait for them to get nice pictures). The feeling in game is just right, I'm highly pleased.

https://www.gran-turismo.com/fr/gt6/user/#!/friend/GT-Alex74/course/2577719/

And a couple small videos of the real deal for reference :


-------------------------------

Finally, a completely fantasy track made with 1.1.1 to touch up some elevations and give a bit of texture to some of the corners. Feels a bit like an older NFS track in a way, fun but quite hard to master, especially with a understeer balanced car.

https://www.gran-turismo.com/fr/gt6/user/#!/friend/GT-Alex74/course/2579147/


Can't wait to play with the latest version ;)
 
I'm working on a new feature that allows you to import an elevation profile (a list of distance and elevation data, in comma-separated values) and apply it to your track. I have run into two problems though, and hopefully you can help me find a good solution:

1. What to do when the distance of the elevation profile is shorter than the length of the track?

Options:
  • Only transform the part of the track that is covered by the elevation profile, and leave the rest to the user for manual editing.
  • Repeat the elevation profile, either from the start, or mirrored from the end.
  • Scale the elevation profile to make it fit the length of the track.
  • Other?

2. What to do on loop tracks (circuits) when the end of the elevation profile doesn't match the start of the elevation profile?

Options:
  • Leave it to the user to fix that manually.
  • Automatically adjust the profile with the feather tool to make the ends meet.
  • Other?

For question 1 I think options a and c should be available, perhaps in a prompt if this issue occurs.

For question 2 I believe both provided options would be good to have as it will all depend on the particular dataset being used.
 
^ This. But it probably means work is gonna get more complicated for you then. If there was only one option to choose then I'd rather have the "edit on provided lenght and let the user finish the rest" as default, as automatic scaling may overwrite some previous work you didn't want to lose. But of course, having the choice would be ideal.
 
1. What to do when the distance of the elevation profile is shorter than the length of the track?

I'd rather scale it, as an imported height profile makes most sense when it comes from data that somehow resembles the 2d track, and so the scaling factor should be close to 1. If the scaling factor is not close to one maybe ask the user if scaling should be applied and if the answer is no just import replacing the heights up to either the height data corresponding total length or the track's length.

Do you plan to leave the height data as is or shift it so that it fits to the height of the terrain according to the height map? I guess shifting the heights to the mean height of the terrain would be better as leaving the heights as is could lead to the track standing out against the elevation profile of the landscape or forming deep valleys in the terrain.

What to do on loop tracks (circuits) when the end of the elevation profile doesn't match the start of the elevation profile?

I'd say leave it to the user. It's easily fixed using the elevation editor, and otoh might be intended for some jump tracks. Maybe only adjust the very last point to match the height of the first point to close the rip of the road that can be seen when driving backwards.
 
Thanks for the input!

I guess all the options can actually be available, it will just take a bit more time to write the code.

In the meantime, here is a preview of the interface and a description of how it is going to work:

114pv.png


The elevation profiles (which are just .txt textfiles containing comma-separated values) are loaded using the import button. Each profile will have its own settings and options (hide/display, stretch, repeat, mirror, offset, etc.). Right now there is no limit to how many profiles you can load (in the screenshot above, three profiles have been loaded), and the idea is that for each of the profiles you can chose to either apply or add.

Apply
replaces the height data of the track with new height data sampled from the elevation profile. Add keeps the height data of the track and adds the new height data sampled from the elevation profile.

For instance, say that at a given x coordinate, the z value (height) of the track is 100 and the z value sampled from the elevation profile is -25. Using apply, the the new z value of this height data point will be -25 (replacing the old value with the new one). Using add, the new z value will be 100-25=75 (adding the new value to the old one).

Apply can be used when you have an elevation profile of a real world location and want to apply it to your track.
Add can be used when you're happy with the general elevation but want to add a bit of texture or smaller elevation changes.

You can also load an elevation profile and keep it just as a visual reference, for instance if you want to load the elevation profile of the terrain just to see whether the track is above or below the ground level.

You can create your own elevation profiles in the editor and export them for future use.

That's the plan. Hopefully it can all be done :lol:
 
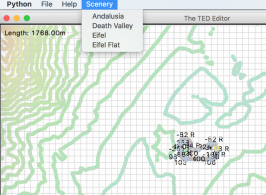
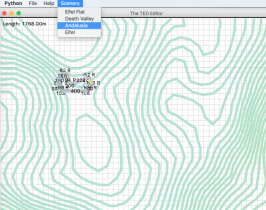
Due to popular demand i've added a scenery switch menu to the ted-editor. Scenery should be inferred when importing a track, so you should end up with the correct contours (and height map under the hood). Heights aren't recalculated by switching, so if you want to force a recalculation with the new heightmap you should to the double reverse trick: press R twice to reverse the track twice, then the elevation editor should show the new heights (quick reminder: pop it up by pressing E, and the banking editor by pressing B). :cheers:
Bildschirmfoto 2016-11-30 um 20.11.38.png Bildschirmfoto 2016-11-30 um 20.12.33.png

I recreated the contours from the heightmaps again, now with 10m height separation, there can be sluggishness when zooming out to look at the complete contours, please tell me if it's unbearable...
 
I recreated the contours from the heightmaps again, now with 10m height separation, there can be sluggishness when zooming out to look at the complete contours, please tell me if it's unbearable...

How about making the height separation dynamic, based on the heights range that is currently visible? That way the map will show smaller steps when you zoom in (or when you view a relatively flat scenery, like Death Valley), and bigger steps when you zoom out.

You can use this function that I created for dynamically calculating the grid size in the elevation editor:

Code:
def stepFinder(n, subdivisions):
    '''Finds the step size'''
    #Find if n is negative - you can skip this step if you only intend to feed this function with positive n values
    sign = 1 - (n < 0)*2

    #List containing the available step factors
    factors = (1, 2.5, 5)

    #Extract significand and potencia
    string = '%.1E' %(n/subdivisions)
    [significand, potencia] = [float(s) for s in string.split('E')]

    #Select step factor and return step size
    stepFactor = min(factors, key=lambda x:abs(x-abs(significand)))*sign
    step = stepFactor*10**potencia
    return step

Just let n be maxHeight-minHeight, and try some different values for subdivisions to find a good balance.

Of course, another option that might be easier to do would be to let the user set the step size manually...
 
Due to popular demand i've added a scenery switch menu to the ted-editor. Scenery should be inferred when importing a track, so you should end up with the correct contours (and height map under the hood). Heights aren't recalculated by switching, so if you want to force a recalculation with the new heightmap you should to the double reverse trick: press R twice to reverse the track twice, then the elevation editor should show the new heights (quick reminder: pop it up by pressing E, and the banking editor by pressing B). :cheers:
View attachment 611310 View attachment 611311

I recreated the contours from the heightmaps again, now with 10m height separation, there can be sluggishness when zooming out to look at the complete contours, please tell me if it's unbearable...

Amazing thank you! Will this fix the glitch with trackside objects since it should load the correct scene now?
 
Amazing thank you! Will this fix the glitch with trackside objects since it should load the correct scene now?

Maybe but if you make big changes to the 2d tack the road and deco can still be way off. This is because i just stretch the placement to fit the new track length, like the track was a rubberband stretched on the new track and the placement was marked on this rubberband so there will for example still be gaps between curbs if the track gets much longer. For complete control you have to wait for the road/deco editor, coming Real Soon... :rolleyes::lol:
 
Is there a way to raise the entire track height after already having done the elevation change's to said track ?

Example: I've just finished all elevation changes on Oran Park to perfection but feel it's slightly too low into the scenery & would like to raise the track by 5m without ruining the elevation change. I know I could do it in blocks upto 1000m using @eran0004 tool but just wondered if there was an option to select the whole track.

There's a command called "Translate" which raises the entire track.

translate.png
 
Is there any chance to create a short track with an adjustable straight which are too long . Any apk. which could be use ?

I think manual hex editing is the only possibility right now. If you want a pit lane, the minimum straight length is about 400 meters (on Eifel) as that it the length of the pit wall, and the pit wall has a collision mesh that doesn't bend so it needs to be straight.

You can scale the pit segments and make them even shorter, but your track may not work properly if you scale the pits too much.
 
Is there any chance to create a short track with an adjustable straight which are too long . Any apk. which could be use ?

You can't alter the length of the pit lane currently but you can alter the curving of the start/finish straight of an existing track with the ted-editor, i did a small experiment here that seems to work for pitting on and offline.
As long as the curves aren't too tight it might work but there may be problems with the collision mesh of the pits as @eran0004 mentioned so your mileage may vary. Unfortunately little is known about this collision mesh, i.e. if it's constructed to bend around curves or only allowed on straights. More experiments needed...
 
Is there any chance to create a short track with an adjustable straight which are too long . Any apk. which could be use ?

You can create an APK file with a predetermined length pit straight, but not on the fly adjustments. I believe we've done ones as short as 50m though for pits to function you probably need 200-250. You can check out my Sebring Club Course or Anderson RacePark (which is now finally posted here at GTPlanet) for examples.
 
Last edited:
Wow guys, just wow. The progress that I've seen while catching up by skimming through the topic. I'm still working on replacing my PS3. Still playing vanilla version. I miss all the extra features. The PC I used for blustacks to use the TPE has crasehed and is in teh shop. So the canyon run I had is gone.
The questions I have now are:
Can you create cut's in the hill's and mountains with the newest tools?
Ex:
cutout.PNG

cutout2.PNG


Also, I've read that you can place track side objects anywhere. Does that mean that the black areas that the TPE wouldn't let you place them in are now available?
Also, do we have an easier way to place restaurants on our roads?
I've read somewhere on here that the new ted editor can adjust the shoulder width of the road, is that true?
Plus does it show where the scenery object are at?
Plus, can we finally remove the track side guardrails?
Does anyone know if my tracks are still online?
You guys are getting me hyped up about this. :D
 
The questions I have now are:
Can you create cut's in the hill's and mountains with the newest tools?
Ex:
cutout.PNG

cutout2.PNG

Yes. If the road is lower then the terrain it will cut through it.

Also, I've read that you can place track side objects anywhere. Does that mean that the black areas that the TPE wouldn't let you place them in are now available?

Yes, with hex editing you can place them anywhere along the track. Not sure if the feature is included in the ted editor though, as I haven't been able to install all the modules yet.

[/quote]Also, do we have an easier way to place restaurants on our roads?[/quote]

Same as above.

I've read somewhere on here that the new ted editor can adjust the shoulder width of the road, is that true?

Not that I know of. But you can change each road segment to a version where the walls are further away, when available, such as the runoff areas at Andalusia and Eifel.

Plus does it show where the scenery object are at?

I don't know. You can see their positions in the file though.

Plus, can we finally remove the track side guardrails?

No. They are a part of the road and not something that is added separately.

Does anyone know if my tracks are still online?

If you log in at gran-turismo.com you can find that info there :)
 
Update time: Elevation editor 1.1.4b (yes, we skipped 1.1.3 as it's already obsolete).

Edit: Oops! Some icons are missing. Will be fixed asap!
Edit 2: Fixed! New version is called 1.1.4b.

Changes:
  • Elevation profiles. You can import and export elevation profiles and use them when sculpting the elevation of the track, either as a reference or by applying them directly to your track.

    An elevation profile is a simple text file (.txt) with comma-separated values. The first column is the distance in meters, and the second column is the elevation in meters, like this: 0.0,0.0
    Distance (m),Elevation (m)
    0,-181.184061
    5.986809,-181.188625
    11.973618,-181.189402
    17.960427,-181.184029
    23.947236,-181.17014
    29.934045,-181.145373
    35.920854,-181.107364
    41.907663,-181.054667
    47.894473,-181.004695
    53.881282,-181.014783
    59.868091,-181.067913
    65.8549,-181.130746
    71.841709,-181.163027
    77.828518,-181.173102
    83.815327,-181.172822
    89.802136,-181.156519

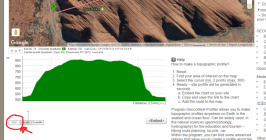
    Elevation profiles can be created manually or generated from websites such as: http://www.geocontext.org/publ/2010/04/profiler/en/
    (click on CSV, see image below)
    Screenshot (4).png
    Keep in mind that elevation profiles generated from maps aren't detailed enough to perfectly replicate a road, but they can give you a rough idea of what the elevation looks like.

    You can also export an elevation profile from a TED file using the elevation editor (file -> Export elevation profile).

    Elevation profiles can be used when you want to recreate a real world route. You can also use it for applying "texture" to your track. There are two modes available: Set and Add.

    Set replaces the elevation of your track with that of the elevation profile.

    Add keeps the elevation of your track and adds the elevation profile on top of it.

    There are a number of options to choose from working with elevation profiles:

    Path-fitting: None, Stretch or Scale

    Scale scales the elevation profile to cover the full length of the track. Both x (distance) and z (height) values are scaled. Elevation profiles that are shorter than the track are scaled up, while elevation profiles that are longer than the track are scaled down.

    Stretch
    does the same thing as Scale, except that it only scales the x values.

    None leaves the elevation profile as it is.

    ---

    Auto-rejoin: None, Lift or Bend

    Bend makes sure that the height at the end of the elevation profile matches the height at the beginning of the elevation profile. This works by bending the end of the elevation profile.

    When an elevation profile is repeated, Lift makes sure that each new repeat starts at the same height as the last one ended at.

    None leaves the elevation profile as it is.

    ---

    Repeat: If this is enabled the elevation profile will be repeated until it covers the full length of the track.

    Offset x, Offset z: You can move the elevation profile in the x and z dimensions by specifying an offset (in meters). Sometimes when you load an elevation profile it may be located several hundred meters above or below your track and at those times you might want to add an offset to bring it down/up to the same level as your track. Note that the elevation displayed in the editor is relative to the track, while elevation profiles are loaded at their absolute height.

    All of these options are non-destructive, i.e. they don't change the data of the actual elevation profile, so you can experiment with some different settings without fear of having to start over and load a new elevation profile.

    There is also a Display option, which is used to display the elevation profile in the main canvas (the blue one). The profile is drawn in a dark blue/gray shade. It might be good to know that when Display is disabled, the profile is erased from the canvas. If you're working with multiple elevation profiles and notice a drop in performance it might help to disable the Display button for some of them. Note that elevation profiles can't be applied to the track while they are being hidden.

  • Other changes: Lots of behind-the-scenes changes. There is a new dialogs.py script that contains most of the GUI elements and I'd like to think that I've also managed to make the application run faster and smoother (although I just got a new computer so it's kind of hard to compare with how it ran on the old one)
Finally: These are all rather big changes and it's hard for me to test all the possible combinations. I did a couple of tests and didn't find any bug so far, but that doesn't mean that they're not hiding in there. So if you find any bug, please let me know. Also, if you have any feedback on the elevation profiles feature I'll be happy to hear it. (For example: does it work the way you thought it would work? Is there any option missing that you would like to have? Is it useful or just a waste of space and time?)

Oh, and this release comes with an elevation profile added to it. It's called bumps_01.txt and you'll find it in the folder Elevation Profiles.
 

Attachments

  • elevation editor 1.1.4b.zip
    24.4 KB · Views: 89
Last edited:
Kudos to all of you that have contributed to these tools, I've been having fun recreating a local track. I'm having a problem with curbing though. If I make edits with the elevation or banking editor my curbs get stretched out and cross over the track. Is there a trick to fix the curbs? Is there a way to get the course back into the Track Path Editor after making changes in TED? Then I could add the curbing last.

Oh, one last thing... is there a track width setting in TED? When I press "o" to make the track open, and then add sections they are a different width than previous sections.

Can you take a picture of this (curbs and width)?

Track width is a global setting, so it should be the same for the whole track.
 
Is the encryption key still needed?

See here for an overview of all the tools. The ted editor can ulopad tracks directly now but it's still a little brittle.

If I make edits with the elevation or banking editor my curbs get stretched out and cross over the track. Is there a trick to fix the curbs? Is there a way to get the course back into the Track Path Editor after making changes in TED? Then I could add the curbing last.

I guess the ted-editor is to blame. If there is curbing or other decoration in the ted on import and you alter the length significantly they will be spread evenly across the new length and gaps will show up between them. You will have to wait until i add the road/deco editing and make most track editing in the TPE. AFAIK there is no way to get the ted file back into the TPE.

Oh, one last thing... is there a track width setting in TED? When I press "o" to make the track open, and then add sections they are a different width than previous sections.

That's another shortcoming of the ted editor, right now each segment can have it's own width internally and if you add segments to an open track they get the default width. But as @eran0004 said the track width is actually a global setting, so my segment widths are not the real deal, so you see more than you get. ;) The global track width isn't currently changeable in the ted editor, it just uses and exports the width it finds in an imported ted or a default width of 8m.
I'll add it to my TODO list... 👍
 
For anyone who downloaded 1.1.4a of the elevation editor, there are a couple of icons missing in that version and it disables the entire elevation profiles feature (yes, it's a fragile construction :P). I've fixed that now and the new version 1.1.4b is available to download from the original post.
 
Looks like the TED editor fuctions do it too, not just elevation or bank edits. It affects the whole track even if I edit just one turn. Notice there seems to be multiple layers of curbs stacked. The track is not even fully lined, only the curves had them originally, but they stretched out enough to fill the whole length.
 

Attachments

  • 20161214_202615.jpg
    20161214_202615.jpg
    94.1 KB · Views: 85
Last edited:
Back