The DIY-ers corner

  • Thread starter Jet Badger
  • 342 comments
  • 35,490 views
I, thankfully, still have my mobility kind of intact, so my rig is fairly low to the ground, but still what, 20cm or about 8 inches rounded up, give or take. But than I made my job harder when I put 2 45 degree tubes for structural rigidity side to side.

I also bolted every joint in the rig that could get loose. It makes easier to brake it in two parts and gets easier to carry around, if I need it. Also using a Smart ForTwo seat is very handy because I can collapse the seat and make it even easier to carry.

I still have a couple of things to do on my rig v3.0, such as finding a way to fasten the shifter and the (eventual) handbrake, cut some excess table top and the screw bars.

And besides that, soon I'm about to take on my most ambitious DIY project ever. More on it sooner, when I've gathered the materials and have the 3D model done.
 
One big improvement you could make would be to raise it up at least 18 in. Makes getting into; more important OUT of rig easier.

Eventually I want to morph it into something that looks like an actual arcade cabinet, which will involve raising it a bit off the ground. That's a project for when I'm not constrained by apartment living though.
 
TB
You can't just drop that on us without some more details!

The microphone of my HyperX Cloud Stinger broke and the warranty expires soon I believe. Then I watched a Fostex modding video on YouTube and that inspired me. Instead of buying a new headset or headphones I'm gonna do some good ol' mod work on them. Recicle the drivers, 3D print some new enclosures, upgrade the connector, get some better cables, add a mini jack for a detachable mic and we're good to go. Three problems: lack of time to do it right away as I'm in mid term exam season, non existing soldering skills and no ideas to break away a silicone joint, but I think I might have a solution for that.
 
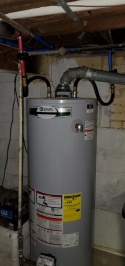
So I replaced this thing....
20191106_171414.jpg
Inspector comes out Friday. Also replaced a bunch of the old cast iron pipes with PEX. Sweated some copper. Had a good time. Now to figure out why the hot water side seems to have lost some pressure.
 
So I replaced this thing....
View attachment 863428
Inspector comes out Friday. Also replaced a bunch of the old cast iron pipes with PEX. Sweated some copper. Had a good time. Now to figure out why the hot water side seems to have lost some pressure.

I really don't want to come off as an ass, but there are a couple things I notice just looking at it which will get you called on.

The venting appears to be pitched wrong and doesn't look like it's attached to the hood (which is a major problem as it will result in CO2 leaking into the house instead of outside) and you also need a piece of copper (or PVC if the Michigan code allows it) coming off the relief valve ending within a foot of the floor.

As for the pressure issue, it's likely due to the connector being too long causing a trap, which will result in air being stuck in the line.

Again, I really don't want to across the wrong way, but the first thing definitely needs to be addressed ASAP.
No worries, I can take constructive criticism. Your bot an ass for looking out.
I took the pipe off the old water heater and put it on already. I just took that picture first. And I do hope they are acting as a trap. More for heat than air though.
As for pressure, it seems mostly to be at the kitchen sink. That's where I was initially testing and opening the faucet valves since it by the basement stair. My guess is that somewhere in the whole fiasco of installing the pipes, some crud got knocked loose and is blocking water flow in the 3/8 line somewhere.
Try taking the aerator off at kitchen sink as these like to get crud in them that block water flow.
 
Try taking the aerator off at kitchen sink as these like to get crud in them that block water flow.
Did that and there was definitely crud. But this is affecting the hot side only. I do need to clean the rest of the aerators around the house though.
 
I really don't want to come off as an ass, but there are a couple things I notice just looking at it which will get you called on.

The venting appears to be pitched wrong and doesn't look like it's attached to the hood (which is a major problem as it will result in CO2 leaking into the house instead of outside) and you also need a piece of copper (or PVC if the Michigan code allows it) coming off the relief valve ending within a foot of the floor.

As for the pressure issue, it's likely due to the connector being too long causing a trap, which will result in air being stuck in the line.

Again, I really don't want to across the wrong way, but the first thing definitely needs to be addressed ASAP.
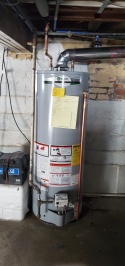
So, coincidentally all three things you mentioned failed inspection. The loops weren't the issue, but the material was. They needed to be hard line or a certain brand of stainless flex. The copper option was far cheaper. I ended up having to do some work on the chimney wall to get the vent right. I also bumped up the size to 4 inch from the previous 3. And while I did have a pipe on the relief valve, it was a couple inches short of the floor so I made up another out of copper. They will be back to inspect tomorrow.
Thanks for looking out Northstar. I should have paid a bit better attention and save myself a few bucks setting up a second inspection.
20191117_115204.jpg


Edit:
Just got inspected and passed. Happy days. Now to figure out how to address some of the things the buyers inspection found.
 
Last edited:
It has been roughly 1.5 months since I started the headphone build. So first, the spec:
  • 50mm drivers salvaged from an HyperX Cloud Stinger headset;
  • Semi open-back, sort of, thing. Basically I'm experimenting with open back and exposed drivers but then I'll be using a 1.5mm piece of cork as an insulator and see what happens;
  • Mini XLR detachable cable;
  • Brainwavz Hybrid Pads;
With the inflow of school work this semester I could only put, like, 1h per week onto the project, but here's the state of it:
  • Basic earcup design is finished, I need to improve the mounting points, the flex in the middle of the cup and the diameter where the mini XLR plug sits;
  • Materials are pretty much all gathered. I am waiting on a couple of things like thinner cables and soldering stuff
  • The headphones is in pieces but I haven't de-soldered anything yet, because I didn't have the hardware
  • The detachable cable is braided
What's left to do then? Well, the list is big:
  • Design the driver mounting plate;
  • Design the grill+cork mounting plate;
  • Design the headband
  • Print everything
  • Solder all the components
  • Build the damn thing
I told you, and myself, this would be a big one, and it's turning out to be so. But it's fun!

In the meantime I started to gather stuff to install LEDs to my un-backlit mech keyboard. And the keyboard will be the next one I'll tackle
Keep it up and soon you will be gatewayed into bodnar boards and Arduinos....
 
I'm wondering if anyone would be able to help me out please?

I have a friend who is converting a van into a campervan and has asked me to look at the electrical schematics and draw up a shopping list, which I've done. The only thing missing from the schematics is a 240v mains input for if they were at a campsite.

I can find the parts they need to get the electrics in, but I don't know how to switch between 240v AC mains and 24v DC battery supply. I'm guessing it would be a relay of some kind, but would some lovely peeps be able to help out with this please?

I think @Shaun might be your man, or @Dennisch who does things with electrics.
 
I'm wondering if anyone would be able to help me out please?

I have a friend who is converting a van into a campervan and has asked me to look at the electrical schematics and draw up a shopping list, which I've done. The only thing missing from the schematics is a 240v mains input for if they were at a campsite.

I can find the parts they need to get the electrics in, but I don't know how to switch between 240v AC mains and 24v DC battery supply. I'm guessing it would be a relay of some kind, but would some lovely peeps be able to help out with this please?
Are you looking for a converter or trying to get both ac and dc across the same power line? A converter is easy enough. If you mean the latter, the typical way to do it is to run separate lines and plugs for both. Some systems like AC and fridges in a camper will use both ac and dc. AC would be ran to white or black outlets, DC to orange or red.
 
Are you looking for a converter or trying to get both ac and dc across the same power line? A converter is easy enough. If you mean the latter, the typical way to do it is to run separate lines and plugs for both. Some systems like AC and fridges in a camper will use both ac and dc. AC would be ran to white or black outlets, DC to orange or red.

Basically, the idea is to run from the battery when off-grid and the mains when on-grid. When on-grid, I'm looking at powering the mains sockets and the ancillaries such as fan, fridge and lights, but not to recharge the batteries.

If you take a look at the schematic attached, the idea is to run it mains sockets (in the bottom left hand corner) after the inverter, so a switch would be needed there, and then another switch connected to a 24v inverter which then connects to the lights (in the bottom right).

Ideally, I'd like it automatic so that when the system detects a 240v source it will switch to that and disconnect the batteries. If it's manual, that's fine, but it would then need to be an on-off-on switch from two sources.

campervan schematic.PNG
 
Last edited:
When I built my cockpit a few months back I used an old, cheap office chair I had lying around. It turned out pretty much as one would expect and broke after a couple months. Originally my plan was to replace it with a used car seat but everything I found was either in rough shape, expensive or had electric adjustments. So I broke down and bought a new one. It doesn't look much like a proper race seat, but I figured I would go for comfort.

I was kind of worried when I ordered it though as there seemed to be conflicting information as to whether or not it came with the slider assembly. Thankfully it did (although it was a pain to assemble) and it actually worked perfectly with how I had the old seat mounted.

579E7213-9FEA-4912-9463-671A6F833CB5.jpeg


My next project is making a small table to sit next to it as I'm currently using the G29 box for that purpose (adding a bluetooth keyboard & mouse is also on my list).
 
When I built my cockpit a few months back I used an old, cheap office chair I had lying around. It turned out pretty much as one would expect and broke after a couple months. Originally my plan was to replace it with a used car seat but everything I found was either in rough shape, expensive or had electric adjustments. So I broke down and bought a new one. It doesn't look much like a proper race seat, but I figured I would go for comfort.

I was kind of worried when I ordered it though as there seemed to be conflicting information as to whether or not it came with the slider assembly. Thankfully it did (although it was a pain to assemble) and it actually worked perfectly with how I had the old seat mounted.

View attachment 890437

My next project is making a small table to sit next to it as I'm currently using the G29 box for that purpose (adding a bluetooth keyboard & mouse is also on my list).
It's nice racing in a proper seat, and honestly I think going full racing seat in a static sim rig is only good for aesthetics. I'd much rather have a really cushy luxury car seat I can comfortably sit several hours in than a race seat that makes my legs go numb 30 minutes in.
Nice seat though. Looks like its decently cushioned. FWIW, getting an electric seat working isnt all that hard. I plan on getting an electric seat, possibly from an older caddy or Lincoln.
 
been a busy couple month at the new homestead. We have been putting in work around the house, running network cables, clearing the property of tree debris, getting the pole barn, along with all my tools, wood car parts and other wonderful (don't care what my wife says, its amazing stuff!) thing organized. I made a desk out of some reclaimed counter tops for my game room. Still have to figure out a server/network cabinet for the closet, and a bookshelf for the little nook. But thats going to take some consideration, especially the closet as I will need to find a way to vent the heat not into the room, which already gets hot from my gaming PC. I am thinking I may vent it straight up and out of the roof as its on the top floor and the access to the attic space is in that room.

Anywho. Thats for a later post. Today, I present to of my latest projects.
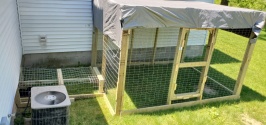
First up is our cat enclosure.
20200611_135637.jpg
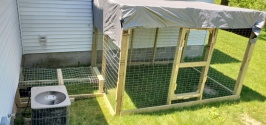
This is the "rough draft" if you will. I have put a large branch the feel from a walnut tree in our yard. That I will be attaching platforms too. I am working on a platform for the basement know where that tunnel comes in to the window. It will have little car door thing in it to help keep pests outside. 6 cats do a good job, but I'd hate to think of the spiders and crap that could get in if we left the window open all of the time.
I am going to get rid of the tarp as well, and replace it with some corrugated plastic roofing panels. Probably white, and maybe keep the tarp under that to improve shade. I am also going to put a couple of panels on the top of the tunnel so I can get a weed wacker in there to trim the grass.
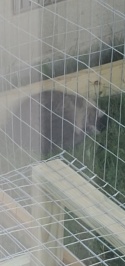
One of our cats has really been enjoying it at least.
20200611_173646.jpg
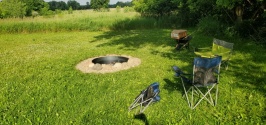
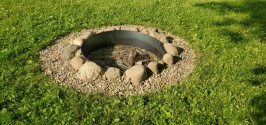
Also did a number on the old fireplace the previous owners did. I unfortunately don't have and before pictures. It was the run of the mill stone ring fire pit. About 48-50 inches.
As it turns out, the previous owners also had a pool that they got rid of, but never cleared out the stones or tarp from. While not pleased by this, the stone came in handy. We got a proper 48" iron ring. Used the field stones the original pit was done in to surround the ring, and dug out a circle about 54" around those. Then back filled that and filled in the empty spaces around the bigger stones. Its not big and elaborate, but little things make a difference.
20200620_181916.jpg 20200620_181904.jpg
 
So, I've been drinking and am vaguely listening to the latest JRE podcast with Josh Barnett. They said something about bamboo. Well, one of the projects, aside from a new isolated racing rig with lots of tactile transceivers, is making my own canoe. The very first I plan on making is going to be a prototype touring/whitewater canoenaround 12 feet in length. It will be plywood because its going to be my first go. And as such I expect it to be more prototype and learning price than for long term use. However, ibam thinking maybe it would be cool to see what bamboo has to offer. I know that there are several types of bamboo that will grow quite well in Michigan, reaching 14 feet plus. Bamboo, especially coated with resin and fiberglass or even better Kevlar, will withstand quite a betting I imagine. So I think I maybe clear a small area of my trees to make a small spot to grow either a small crop of spectabilis or Red Margin. I've got some clean up, amd some box elder tree to remove. Definitely have some areas that will be cleared for growing. More to come on this front. Maybe even itsnown thread.
 
Just finished up the cat enclosure. Took longer than I wanted having started the project beginning of June. Then I had constructed the walls and covered it over with a tarp for a temporary roof.
20200611_135637.jpg
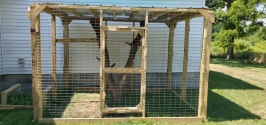
I eventually placed a large branch that fell from a walnut tree in there for the cats to climb. As some point ill probably add some planks to make spots for them to laze about as well.
Anyway, that branch ended being a bit to tall and during a storm ended up rubbing through. This ended up allowing one of our more industrious cats to climb out and taken off for a few days. Welp. That shut down the enclosure for a few weeks while I finished off other projects. Finally got around to getting it done. New roof is on and well, that cats will do as they do and enjoy it on their own time.
20200815_132440.jpg

Now that thats done, I'll move it back down the list of to do's and come up with some boxes and beds to lay on/in.
Here's a sneak peak at the next project to get my attention.
20200815_133942.jpg
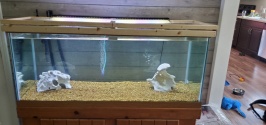
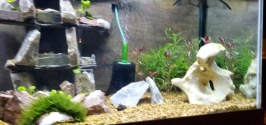
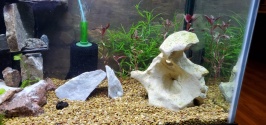
I think both pieces of rock will occupy on side of the tank, where I hope to have an electric blue dwarf cichlid residing. To the right will be some drift wood. And where the bubble stone is I think I am going to build a sand waterfall using some slate stone. In the back corners ill be planting some swords and maybe a fern or two. Aside from the cichlid, we are going to do a small school of angelfish and rainbowfish. Might do a few corydoras and otos as well. And because this is the type of hobby that gets addictive, I have a second 20 gallon aquarium that will probably go upstairs in my game room. And of course, we have been floating around the idea of building g a second pole barn for actual car storage and not workshops for me... might as well build a fish room right on in with it....
 
Keeping this thread alive!
Just finished another little DIY. In ny "game room" I have a little nook next to the closet. I had first thought to make it where my desk is, recessed into the nook, saving a fair bit of usable floor space. After a test fit though, my triple monitor setup wouldn't fit so tharvwas the end of that. I'll post pics of my desk once I finish it. Need to get counter top epoxy on it and properly leveled first.
Anywho, i had a couple of shelf/cabinet sections, about a foot or so wide/deep and 4 feet tall. I don't really like the look of them though. I've been thinking about building a book case into the nook. My idea was to make a book case, lug it up to the room and install it. Then it dawned on me it will be a whole lot more easy, economical and lighter to just build shelves into the nook.
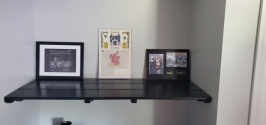
20200818_104445.jpg
Looks not to bad. Built out of some untreated wood "flooring" boards and 2x4s. I cut the 2x4s down to 2x2.5 and thinned out and rounded the last 3 inches or so. Ebony stain and a couple coats of poly. I have enough left over to make a smaller shelf above that. It will be one flooring board shorter. Then I plan on making a cabinet below that to hold up to a 40 gallon aquarium.
Its nice getting these projects finished. The house is finally starting to feel like our own.
 
I ended up making that shelf in the couple of days following that last post of mine.
20200903_192751.jpg
I like it enough that I am considering doing on 8x piece that rings the room a foot or so below the ceiling. Definitely at the very least the wall to the left of the picture.
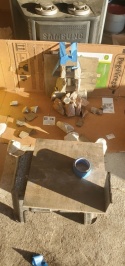
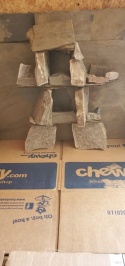
I also got the slate tile in for the aquarium. I've found some rather large chunks of either feldspar or quartzite. I'm not a stone expert though and telling the difference is just a touch beyond me. Either works in an aquarium though, so I have been chiseling the big chuncks into little slabs and bits. This is what Ive got so far.
20200903_185509.jpg
The pipe running up the back has an air stone in it. When the airstone has air passing through it, the resulting cascade of rising bubbles creates a current strong enough to suck sand up the tube and shoot it out the top where the stone supported by the blue tap is. This sand then "waterfalls" back into the cup at the bottom of the structure to be sucked back up and shot back out again.
Anywho. Going to fill in the open spots as well as the edge of the tiles hanging out with various stones and plants.. Then two slate tiles, one of which is the tile in the foreground, will go out to either side to finish off the background. Gonna look noice!
 
Ok. Got the aquarium background about done. Just needs to set up for 7 days, then get a good washing.
20200904_135851.jpg
Once its fitted into the aquarium, all of the platformed areas off to the sides are going to be filled with rocks and plants, the center just rocks as the sandfall will be there. I have a lot of red stone that will create the "bowl" the sand falls into.
I think the worst thing about the aquarium hobby is all of the waiting. Gotta wait at least 7 days for the caulk to cure. Get it in the aquarium. Then wait around a month for the tank to "cycle". Then get fish. Then wait for that to cycle. Then get more fish. But, before you get those fish in, you need a second tank to quarantine them in just incase they are sick but not showing it yet. So wait another week. Assuming you cycled a tank first. Luckily you can use a precycled sponge filter and water from your other aquarium to kinda quick cycle. I have 2 bubble filters just for this.
I think once I have the background into the 75g tank, I'll move on to getting this little 20 gallon setup.
 
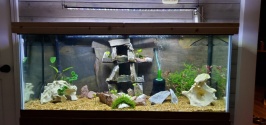
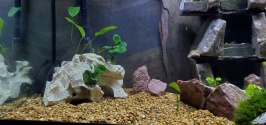
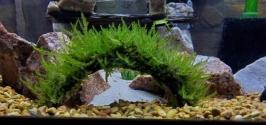
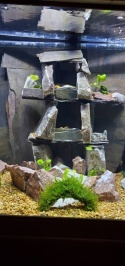
And done!20200916_195833.jpg
20200916_201501.jpg
20200916_201512.jpg 20200916_201525.jpg 20200916_201527.jpg 20200916_201533.jpg
All of the plants in there are growing quite quickly. Some of the pogo (green plant last pic in the back) has nearly doubled in size since getting a month ago. The gold coin anubias (the shorter, darker green plants on the left side of the tank) has also grown considerably in the two weeks I've had it.
Going to pick up some boesemani rainbow fish tomorrow.
 
I fixed my girlfriend's 14-year-old sewing machine that suddenly started making an loud intermittent knocking noise which turned out to be caused by bits of the mechanism knocking into each other, but only when downward force was applied to the knob that manually cycles the mechanism (imagine pushing it like a big button rather than turning it).

I managed to spot a cracked piece of plastic on the inside through an observation hole in the case so I opened it up and found the broken bit was a bearing support for the crank that moves the needle up and down, this being broken meant you could push the crank in and it'd hit other bits, obviously it being loose wasn't good even if you did pull the knob back out to stop the noise.

Gluing it back down without dismantling anything - the mechanism looked pretty complex and I was worried the timing pulleys would come out of time if I took anything out - was the hard part because a) the timing belt was pulling the shaft downwards so quite a lot of force was needed to hold it in position and b) the bit I needed to glue was obstructed by bits of mechanism, so I ended up using a hacksaw and pliers to modify a tin can to support the bearing mount while "missing" other bits of the mechanism, then supported the machine face-down on that can and a couple of others, balanced and weighted using a chunk of an anvil (long story):

20201004_192752.jpg


I also fashioned an air duster nozzle into a Gorilla glue applicator by sharpening one end so I could push it into the glue bottle nozzle and cutting the other end at 45 degrees to get a nice accurate way of dispensing glue into the crack.

She managed to make a pair of trousers with it today so it seems to be working! I fully expect it'll break again eventually, at which point I guess I'll drill all the way through the case and bolt the mount in instead. It's probably the most complicated thing I've ever fixed, I'm pretty proud that I was able to use what we happened to have lying around to do it considering we have basically no tools or materials here...
 
So we bought our house when it was only 2 years old 15 years ago which means it is now getting to the point where some stuff more than just routine maintenance is required. As I'm a tight arse and a glutton for punishment I refuse to pay anyone anything to do anything unless I really can't do it which so far I haven't come across.

Last couple of weeks has been the laundry.

First up I "ahem acquired some timber for the bench top" sourced the bench top with some help from friends. Some timber around 100 years old off an old work bench at work.

PXL_20201015_225212240.jpg


Looks horrible but look what happens once it has been though the thickness plane and cut to size.

PXL_20201019_235549366.jpg


Next step a little plumbing and electrical in the laundry just before the new plaster.

PXL_20201028_040943243.jpg


New plaster, cupboards, washing machine and timber sitting in place.

PXL_20201101_093248672.jpg


Pretty much all done now barring some trim at each end of the timber benchtop.

PXL_20201105_082019262.jpg


PXL_20201105_083417836.jpg
 
Last edited:
Ok so continuing on from above.
Next up the bathroom which was a whole lot more work than the laundry as it was pretty much a complete strip out.

Bizarrely the era in which my house was built they neglected to waterproof between the tiles and plasterboard. Nowadays they do and previously cement sheeting was used in wet areas to prevent water damage.

So in my case once the grout in the tiling lost its waterproof properties the plasterboard behind becomes wet and tiles start to lift etc etc. Anyway after chipping away in my spare time after work and during the weekends it's finally finished.

PXL_20210130_061804514.jpg
PXL_20210130_061900339.jpg
PXL_20210130_061955525.NIGHT.jpg
PXL_20210130_062057003.jpg
 
Ok so continuing on from above.
Next up the bathroom which was a whole lot more work than the laundry as it was pretty much a complete strip out.

Bizarrely the era in which my house was built they neglected to waterproof between the tiles and plasterboard. Nowadays they do and previously cement sheeting was used in wet areas to prevent water damage.

So in my case once the grout in the tiling lost its waterproof properties the plasterboard behind becomes wet and tiles start to lift etc etc. Anyway after chipping away in my spare time after work and during the weekends it's finally finished.

View attachment 988654 View attachment 988655 View attachment 988656 View attachment 988657
Way behind but damn that's nice!
 
Back