- 169

- England
- Hasher-90
If anyone needs a free video editing program, Blender is a good one to use. It's more commonly known as 3D modelling software but it can do many other things. Here's a guide for first-time users if they're struggling to optimise their recording for GIPHY.
First of all, download and install Blender. I used 2.78 for this tutorial but the current one at this time, 2.79a, shouldn't be any different.
Open Blender up and you should see a screen like this (minus all the recent files because you haven't used it yet)

Currently, it's in its Default mode, for 3D modelling. We'll need to change it to the Video Editing mode.
If you go up to the top where it says 'Default', click on the button outlined in red to choose the Screen layout...

... and click on Video Editing...

... and you should now be greeted with something like this.

First things first, go down to the bottom, where it says Add. Click on that and click on Movie.

Locate and select your recorded clip on your USB or wherever you've placed it. Click Add Movie Strip...

... and you should now see, along the lower section of the screen called the Video Sequence Editor, two bars. The darkish blue coloured one is the video, the teal coloured on is the audio. Don't worry about the audio, we don't need to mess with it.
Press the Home button while your mouse cursor is in the Video Sequence Editor to see the whole sequence.
Next you'll need to change both of the values, outlined in red, to 450. The left value is the end limit of the number of frames your final video will have, and the right value is the cursor point (the green thing that says 15+00)

The reason why is because the 450th frame on this current project, running at roughly 30fps, would equate to 15 seconds.
Now to speed our clip up to fit those 15 seconds. Go into Add, the Effect Strip, then select Speed Control.

Right-click on the pink Speed strip, then go over to the sidebar on the right. Scroll down until you see the tab named Effect Strip and Untick 'Stretch to input strip length'.
Now for a bit of Maths, you'll see in the image below that my Speed factor is 1.200...

This is worked out by dividing the total number of frames of your clip, found on the end of your bar label (540 in my case)...

by the total number of frames we need (450). 540 / 450 = 1.2 so I put 1.2.
Now the clip has been sped up, press Play on the bottom to check to see if your clip runs and loops properly in the top right. You might see a fps counter pop up and slow down as you play but don't worry about that.
Now to export the new clip, go to the top left screen part, click on the square box with an image inside and select Properties...

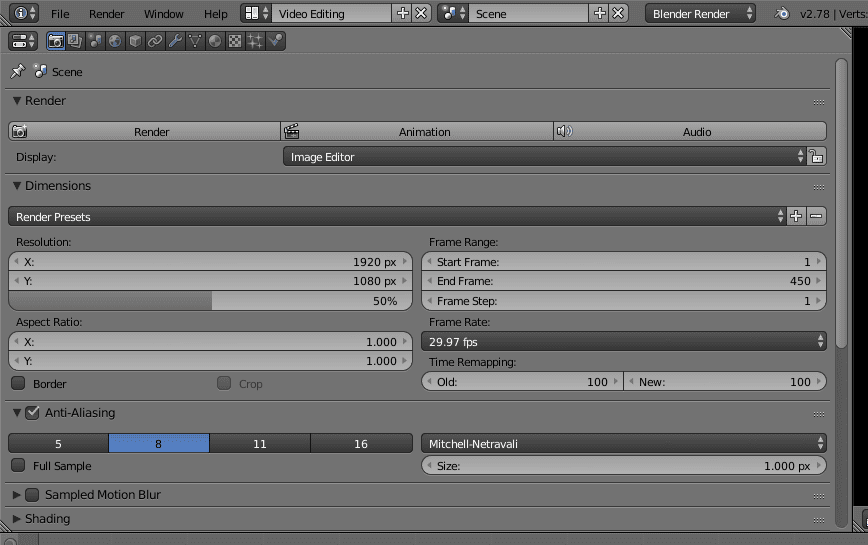
... which will change that screen part to this.

We need to set up the export options and encoding before we export. Scroll down until you see the Output tab and select MPEG, then the Encoding tab will pop up. Open the Encoding tab and make sure you have the Format as MPEG-4, the Codec as H.264 and the Audio as AAC.

Right, scroll back up to the top and hit the Animation button, under Render...

... and you should now see Blender playing through your video and rendering it.

Once it is done, open File Explorer, go into your C:\ drive and open up the 'tmp' folder, there you should see your new video. It'll probably be named '001-450.mp4' or something.
Drag that video into GIPHY, set the duration to 15 seconds and click through the rest and there you go.
Open Blender up and you should see a screen like this (minus all the recent files because you haven't used it yet)

Currently, it's in its Default mode, for 3D modelling. We'll need to change it to the Video Editing mode.
If you go up to the top where it says 'Default', click on the button outlined in red to choose the Screen layout...

... and click on Video Editing...

... and you should now be greeted with something like this.

First things first, go down to the bottom, where it says Add. Click on that and click on Movie.

Locate and select your recorded clip on your USB or wherever you've placed it. Click Add Movie Strip...

... and you should now see, along the lower section of the screen called the Video Sequence Editor, two bars. The darkish blue coloured one is the video, the teal coloured on is the audio. Don't worry about the audio, we don't need to mess with it.
Press the Home button while your mouse cursor is in the Video Sequence Editor to see the whole sequence.
Next you'll need to change both of the values, outlined in red, to 450. The left value is the end limit of the number of frames your final video will have, and the right value is the cursor point (the green thing that says 15+00)

The reason why is because the 450th frame on this current project, running at roughly 30fps, would equate to 15 seconds.
Now to speed our clip up to fit those 15 seconds. Go into Add, the Effect Strip, then select Speed Control.

Right-click on the pink Speed strip, then go over to the sidebar on the right. Scroll down until you see the tab named Effect Strip and Untick 'Stretch to input strip length'.
Now for a bit of Maths, you'll see in the image below that my Speed factor is 1.200...

This is worked out by dividing the total number of frames of your clip, found on the end of your bar label (540 in my case)...

by the total number of frames we need (450). 540 / 450 = 1.2 so I put 1.2.
Now the clip has been sped up, press Play on the bottom to check to see if your clip runs and loops properly in the top right. You might see a fps counter pop up and slow down as you play but don't worry about that.
Now to export the new clip, go to the top left screen part, click on the square box with an image inside and select Properties...

... which will change that screen part to this.

We need to set up the export options and encoding before we export. Scroll down until you see the Output tab and select MPEG, then the Encoding tab will pop up. Open the Encoding tab and make sure you have the Format as MPEG-4, the Codec as H.264 and the Audio as AAC.

Right, scroll back up to the top and hit the Animation button, under Render...

... and you should now see Blender playing through your video and rendering it.

Once it is done, open File Explorer, go into your C:\ drive and open up the 'tmp' folder, there you should see your new video. It'll probably be named '001-450.mp4' or something.
Drag that video into GIPHY, set the duration to 15 seconds and click through the rest and there you go.
 Working on getting the GIF done and will edit it in when I can get it later tonight.


 GL to everyone!


 and I didn't know the S2K race mods were actually inspired by a real Spoon race car!