Fanatec CSW/CSR Elite Modders Thread *UPDATE February 2014*

  • Thread starter eKretz
  • 3,608 comments
  • 608,444 views
I used my eKretz Buhler motored CSR-E until around 2015 then moved the motors to a used CSW V1 which was the wheel I used to race daily on PC until 2023. Then I decided to get a PS5 & PSVR2 to play GT7 so had to retire the CSW-1 and buy a DD Pro. I certainly got my monies worth out of the wheel and eKtrez's motor mod!

Good to hear that. 👍 My first set is still kicking too. If anyone has had any kind of failure, I haven't heard about it.
 
Last edited:
Hi all,

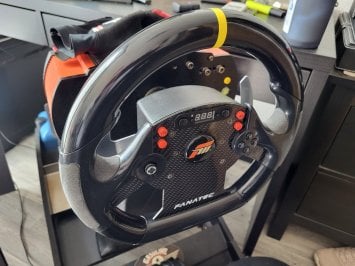
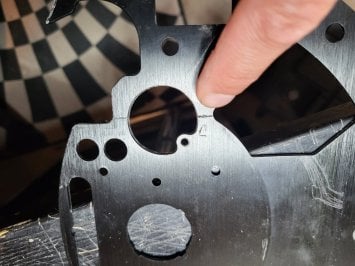
after 9 years of hard racing with Bühler motors the thin aluminum rim/plate broke
inside of my wheel. Bought a used CSR wheel as spare parts dispenser and on time
for the 24H of Nürburgring/Nordschleife it's ready for action again with a fancy
yellow stripe. :D

Motors still go strong - thanks again to eKretz for that bulletproof solution/mod.:bowdown:

I hope the other modders out there who are Bühler powered have the same experience
and fun - keep on racing!:gtpflag:
 

Attachments

  • 20240531_103358.jpg
    20240531_103358.jpg
    176.1 KB · Views: 20
  • 20240531_111528.jpg
    20240531_111528.jpg
    192.1 KB · Views: 20
Last edited:
trying to see if anyone has any help. I have an old CSR Elite that I got way back in the day. I got married and in the process of moving, the thing toppled over and cracked the housing for the wheel portion (the black casing right behind the wheel but before the cylinder attaching to the base. i think mostly cosmetic?). In trying to glue the broken pieces back on, the plastic on the wheel itself got contaminated and is very tacky/sticky (this is similar to or maybe it is, plasticizer migration). so.... does anyone have a line on the spare wheel and housing? This is assuming you bought an old CSR elite for other parts and find that you don't need those pieces in particular.
 
trying to see if anyone has any help. I have an old CSR Elite that I got way back in the day. I got married and in the process of moving, the thing toppled over and cracked the housing for the wheel portion (the black casing right behind the wheel but before the cylinder attaching to the base. i think mostly cosmetic?). In trying to glue the broken pieces back on, the plastic on the wheel itself got contaminated and is very tacky/sticky (this is similar to or maybe it is, plasticizer migration). so.... does anyone have a line on the spare wheel and housing? This is assuming you bought an old CSR elite for other parts and find that you don't need those pieces in particular.
Hi rokkon,

the tacky/sticky plastic parts can be cleaned with an old T-shirt and spirit. Just apply some spirit on the cloth and rub the tacky/sticky parts with it (it will need some time and endurance to get it nicely done), it does not matter if it is the housing or the wheel.
I have some steering wheel parts (steering wheel rim) left but unfortunately no housing parts.
The housing cover on the back guides the airflow, so it should be closed to ensure the best cooling - if there is just a crack/hole you can fix it with duck tape. I sealed the gap between the housing and the wheel base that way because my Bühler motors are a bit bigger than the standard ones and without sealing the gap air will come out and will not flow the way it should.
Where are you living? When transportation costs are not too high for you can send you some needed parts if you send me pictures from the parts you need.

Cheers,
 
Last edited:
Hi rokkon,

the tacky/sticky plastic parts can be cleaned with an old T-shirt and spirit. Just apply some spirit on the cloth and rub the tacky/sticky parts with it (it will need some time and endurance to get it nicely done), it does not matter if it is the housing or the wheel.
I have some steering wheel parts (steering wheel rim) left but unfortunately no housing parts.
The housing cover on the back guides the airflow, so it should be closed to ensure the best cooling - if there is just a crack/hole you can fix it with duck tape. I sealed the gap between the housing and the wheel base that way because my Bühler motors are a bit bigger than the standard ones and without sealing the gap air will come out and will not flow the way it should.
Where are you living? When transportation costs are not too high for you can send you some needed parts if you send me pictures from the parts you need.

Cheers,

i live in the US (Texas). I'll give it a try cleaning using alcohol. I ran into the same problem of plasticizer migration on some other 3rd party controllers and a few card deck boxes. i attempted a cleaning on the deckboxes because they were cheap but was unsuccessful getting them satisfactorily clean. i may try harder on this, though. my bigger concern is whether the broken portion will hold up, but we'll see?


Update: I tried the alcohol on the sticky plastic parts and it seems to have improved it to the point where it's at least playable. It's not 100% there, but it's at least no longer so sticky that it wasn't use-able! Thanks for the tip!


20241023_071631.jpg
20241023_071646.jpg
 
Last edited:
Hi rokkon,

good to hear that the alcohol/spirit cure worked! As said, it takes some time and work to get
it properly done - I had not the patience in the first run so I had to make it twice, disassembling
the wheel makes it easier to clean everything but it's timerobbing.
I am working actually on a real wheel and a button box which will be running via Arduino.
Still some steps to go but looks promising.
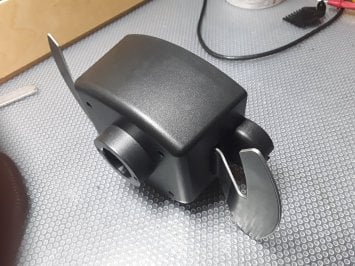
When I've completed this, my old, original wheel is vacant, so if you need the black plastic body
which contains the shifters and the wheel I could send them to you.
Otherwise if you are interested in building your own wheel, have a look on thingiverse
or other 3d printer file platforms, I printed my button box at a friend and so far it looks and feels good.
But be aware that, if you build your own wheel, you have to extract the pcb from your wheel and put it
in an extra/separate housing as you need the original electronics for setting up/calibrating the wheel
at startup.

Despite direct drive wheels are out some time, the CSR Elite with Bühler mod is still a very good wheel
in terms of force and accuracy - it's worth to play with it.

When my real wheel is ready I will post it here but here already a little spoiler and a picture of the plastic
housing you need:
 

Attachments

  • 20241024_135400.jpg
    20241024_135400.jpg
    292.2 KB · Views: 7
  • 20241024_140358.jpg
    20241024_140358.jpg
    241 KB · Views: 7
Last edited:
Hi rokkon,

good to hear that the alcohol/spirit cure worked! As said, it takes some time and work to get
it properly done - I had not the patience in the first run so I had to make it twice, disassembling
the wheel makes it easier to clean everything but it's timerobbing.
I am working actually on a real wheel and a button box which will be running via Arduino.
Still some steps to go but looks promising.
When I've completed this, my old, original wheel is vacant, so if you need the black plastic body
which contains the shifters and the wheel I could send them to you.
Otherwise if you are interested in building your own wheel, have a look on thingiverse
or other 3d printer file platforms, I printed my button box at a friend and so far it looks and feels good.
But be aware that, if you build your own wheel, you have to extract the pcb from your wheel and put it
in an extra/separate housing as you need the original electronics for setting up/calibrating the wheel
at startup.

Despite direct drive wheels are out some time, the CSR Elite with Bühler mod is still a very good wheel
in terms of force and accuracy - it's worth to play with it.

When my real wheel is ready I will post it here but here already a little spoiler and a picture of the plastic
housing you need:


that is very cool. I might consider doing something similar. for a long time, I had ideas on projects I wanted to do but put them off after getting married and moving. but, in the process of cleaning up the room that has had my current setup, i started going through everything and will eventually start to look at projects for fun. this might be a good one to tackle eventually. my older projects involved some custom pcbs and arcade fightsticks, so working with pcb's doesn't bother me any. it all comes down to time and enjoyment.
 
that is very cool. I might consider doing something similar. for a long time, I had ideas on projects I wanted to do but put them off after getting married and moving. but, in the process of cleaning up the room that has had my current setup, i started going through everything and will eventually start to look at projects for fun. this might be a good one to tackle eventually. my older projects involved some custom pcbs and arcade fightsticks, so working with pcb's doesn't bother me any. it all comes down to time and enjoyment.
If you plan to do something in that direction, I can mail you the .stl files for 3d printing and the link for the button box.
Give me an info when you need something.

Cheers :gtpflag:
 
Hello there,

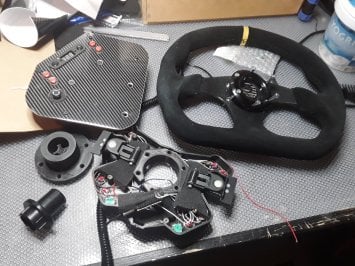
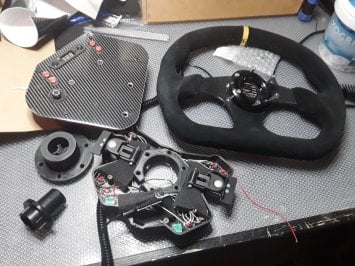
as already announced, I updated my CSR Elite wheel base with a real size wheel and a 3d print button box, magnetic shifters and wheel/base adapter.

To do so, I had to "extract" my old wheel pcb to an extern box (the old pcb is necessary for the wheel base setup, calibrating etc.).
When I did this, I took the chance to give a little maintenance to my wheel like cleaning (the plastic cover on the back was sticky), lubricating, fixing loosened things etc. as it was not opened for almost a decade! :)
As the air which is pumped into my Buhler motors is clean/dust free, the motors look like new from the inside while the rest of the base has a patina of dust.

I searched in THINGIVERSE (.com) after a CSR elite wheel adaptor and a button box with shifters. A friend just printed the parts and then I took an Arduino sketch for a button box with rotary encoders from XSIMULATOR (.net).
After cleaning all parts, attaching all button switches, rotary encoders and wiring everything together I´ve put the wheels on a scale.
the original wheel was 1.097 kilogram and the new one was 1.564 kilogram.
I have a 3 ribbed belt as spare part, but I left the original 2 ribbed in the wheel base as it looks still ok and the change would have been a lot of work. The 2 ribbed belt seems to get along with the additional weight and is more "agile" or smooth than the stiffer 3 ribbed belt.

You can source all needed parts like switches, encoders, neodymium magnets, spiral USB cord, Arduino nano etc. cheaply online (China makes it possible!). I gave my friend for 3d printing 20 Euro and spent 30 Euro for the steering wheel, the electrical parts, screws and magnets were another 40 Euro so I finished the wheel for around 100 Euro plus working hours. The pcb housing was made out of remaining material from my workshop.

The new wheel is a bit ... let´s say softer in reaction compared to the old, lighter wheel which was just a playball for the Buhler motors resulting in a bit "nervous" behavior but the precision of steering feels enhanced (due to the bigger diameter?).
Steering details like understeering, track surface, dirt or curbs feel now more realistic, imho.

On top it´s more solid/robust and feels not longer like a toy.:cool:

In terms of building I can say that it was relative simple with no traps or hooks - I left the shifting paddles in "testing shape" and will exchange them with better ones by time.
If you want to build it and you do not find the files, I can support you - please contact me.

@rokkon: you should consider building this wheel instead of repairing the old one as it gives you enhanced gaming pleasure!


Keep on racing :gtpflag:
 

Attachments

  • 20250103_133842[1].jpg
    20250103_133842[1].jpg
    243.3 KB · Views: 3
  • 20250103_133919[1].jpg
    20250103_133919[1].jpg
    245.5 KB · Views: 2
  • 20250102_194544[1].jpg
    20250102_194544[1].jpg
    222.6 KB · Views: 3
  • 20250103_133819[1].jpg
    20250103_133819[1].jpg
    254.1 KB · Views: 2
  • 20250102_201731[1].jpg
    20250102_201731[1].jpg
    219.6 KB · Views: 2
  • 20250102_192612[1].jpg
    20250102_192612[1].jpg
    196.9 KB · Views: 3
  • 3d_print_2[1].jpg
    3d_print_2[1].jpg
    108.4 KB · Views: 3
  • 3d_print_1[1].jpg
    3d_print_1[1].jpg
    213.7 KB · Views: 2
  • 20250104_131655[1].jpg
    20250104_131655[1].jpg
    163 KB · Views: 3
  • 20241024_1354001.jpg
    20241024_1354001.jpg
    295 KB · Views: 2
Last edited:
Back