Thrustmaster T300 Calibration Issues

  • Thread starter Andysan
  • 97 comments
  • 80,294 views
23
United Kingdom
United Kingdom
Hi,

I have a T300 that will no longer calibrate.

It spins clockwise very hard into the stop, tries again and then gets stuck in an endless loop. I have now rerun the calibration software about ten times, each time it fixes the problem and I can get a few more hours play. So far I have checked the hall sensor mount, and also tried gaming using industrial strength cooling. The sensor mount is not damaged (save a hairline crack in the mount that I think is negligible) and the cooling doesn't seem to stop it losing calibration.

My questions - should anyone know the answers please, I'd be very grateful:

1. What is actually going on - is it the magnet moving on the axle that causes the need for a recalibration? Are there any other possibilities? I've yet to find any guides on disassembly of the motor although I am familiar with doing such things with user-serviceable RC motors.
2. Most people who have these issues seem to report a loss of FFB and having to replace their wheels. I seem to have no such issues, the wheel generally works fine for a few hours until the next time it fails to calibrate - other than this minor hassle the problem doesn't seem to be getting any worse. My question is will it just totally fail to recalibrate at some point?

Thanks in advance.
 
Last edited:
You've done your homework.
First of all mix some epoxy glue and put over the crack. You never know how important role it can play. Also clean the hall sensor and magnet. Rarely but it happens, dust can play some role there.
Lastly, check the plastic cap with the magnet that is attached to the motor under the hall sensor. This sometimes is loose. It might need glueing.
The magnet motor getting loose indeed weakens ffb, I don't think that's your case here.
Also does it lose center anytime? Does the belt feel smooth in operation? Its there any significant clogging feeling when turning the wheel?

Hi asteroulis,

Many thanks for taking the time to help me out - I had been pointed via reddit to a thread you'd originally commented on and I was hoping you may reply.

I shall certainly check those things out that you have suggested. In short, my observations are:

  • I get calibration failure after a few hours of play (whether I play with the case on or not).
  • I never get any type of clogging/FFB issue or any problems whilst playing. It's just that when I turn it finish up and turn off/on, sometimes it wont auto calibrate and spins clockwise hard into the stop.
  • The Thrustmaster calibration tool always fixes the issue, I've done this about five or six times now over ten hours of play.
  • I noticed that a smaller wheel such as the TM open rim means that when the calibration failure occurs it doesnt actually smash into the stop,but I guess it's just because there is less rotating mass etc.

One question I did want to ask someone if I may please - I had (prior to your comments) considered replacing the motor - does the end magnet in the black plastic have to be physically aligned to the magnet inside the motor? I ask because if I removed this I don't know how I would be able to do this, unless I can just put it on any old way and leave the software to sort it out.

Thanks.
 
Further to the above:

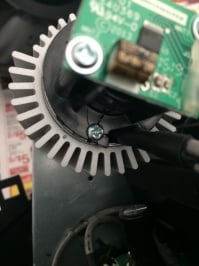
I took the base apart again and checked out the hairline crack in the sensor mount, only this time I removed the sensor board via the two silver screws. And one of the plastic mounts (through not having the board pressed against it I guess) just fell away where the crack was.

I've epoxied it back in place although I will obviously replace the entire part, and reran the calibration software. The wheel seems slightly notchier at higher speeds now and when self-calibrating, although this may be a bit like when you drive your car with the radio off listening for noises - you hear all sort of strange things that normally one would not even perceive.

Many thanks again for your help - I assume this is the root cause but I certainly wouldn't have checked that out again.
 
Hi asteroulis,
One question I did want to ask someone if I may please - I had (prior to your comments) considered replacing the motor - does the end magnet in the black plastic have to be physically aligned to the magnet inside the motor? I ask because if I removed this I don't know how I would be able to do this, unless I can just put it on any old way and leave the software to sort it out.

Thanks.

No , the black plastic cap with the magnet doesn't need to be aligned. That's what calibration does. The magnet inside the motor is used in order for the motor to rotate when power goes through the coils. The small magnet in the cap is only for the encoder. Since the motor shaft is not magnetized they don't interact with each other.

Glad you sorted it out. Yes , this kind if crack is difficult to see unless you unscrew the hall sensor. But easy to fix without replacing the whole plastic base.
Don't forget to always use forced cooling mode and you should be fine!
Also if hard endless calibration loop happens again stop it immediately in order to not damage the main shaft and it's plastic components. Those are not replaceable..
 
Hall sensor replacement. You can try to glue the pieces together, or you can buy a replacement. Short money for a proper fix.

upload_2019-10-8_10-11-22.jpeg upload_2019-10-8_10-12-14.jpeg

https://www.shapeways.com/product/R4GRA59E7/thrustmaster-tx-t300-repair-part?optionId=63288577
 
Hey Folks.

So - bad news - the replacement plastic mount did not fix my issue.

One of the screw holes for the sensor mount isn't threaded quite right and the screw never actually tightens - I thought this was the problem, but I was playing a game the other day (single seater racing, stronger FFB than the GT3 cars I normally race) and I noticed definite FFB drop off.

Sooo - motor next I guess. I've ordered a replacement motor as this seems less of a pain than attempting to disassemble it, but I do realise that both the magnet on the end of the axle and also the pinion gear need to be removed. Are these just fixed on with an adhesive? Has anyone had any luck with (a) something to remove them and (b) something to reaffix them?

Any help much appreciated. Cheers.
 
Hey andy thank you very much for sharing,information of the motor.lets us know the progress of your repair.hope it will be sucessful.
 
Hi,
I think I have the same issue and I am about to order the motor from the link posted by andysan.
The gear can be easily removed with the help of a flat screwdriver (use it as a lever) and easily transferred to the new motor, but no idea how to deal with the magnet.
Has anyone managed to do it?
 
My motor has arrived. Seems there is glue residue on the end where the magnet should go so assume that it isn't new which is annoying. That's life.

I'm assuming that it's just super glued (or similar) on, so perhaps leave the magnet end dipped in a debonder solution or something similar? I haven't tried this by the way.

May reach out to Thrustmaster today to ask them for the part number.


EDIT - The other challenge/gremlin seems to be the soldering of the black motor wire directly to the board. This is a pain as it's on the underside of the board and would mean taking most of the mechanism out. Does anyone know if (assuming this is just a ground) whether one could add it to the two spade connections attached to the motor case?

Cheers
 
Last edited:
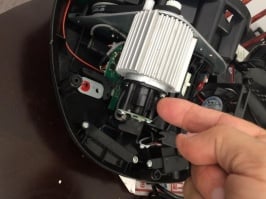
OK, so a few weekends ago I replaced the motor with the replacement from AliExpress - it was the same spec motor as well as it transpired. I'm not going to tempt fate but no issues so far. Below is a basic guide (no responsibility for your wheel or your safety etc...). It wasn't quite as tricky as I'd anticipated, but if you don't frequently take these kind of things apart or you haven't used a soldering iron before you will need someone to help you.

T300 Motor Replacement
1. Remove the rim, power supply etc and make sure you have a good clean space to work in. Take the lid off - there are plenty of guides out there on YouTube on how to do this.
2. Take plenty of photos - you are removing the motor so take a photo from all sides showing in particular the placement of the sensor (mounted to the back of the motor via a black piece of plastic) and also the screws at the front of the unit behind the gear on the end of the motor axle. This is important because the motor can slide up and down and you'll want to get the tension right when you reinstall it. Feel the belt tension, just to get a feel for what to set the replacement motor at.
3. Next, we want to get at the single stray wire that goes from the motor to the board - this is annoyingly out of reach and soldered to the underside of the PCB. The T300 is built up in layers to the way to get at this is to start removing the bolts that hold the various mechanisms in place - this is not scientific, if it looked like a bolt that was holding something in place I basically removed it. Most of these bolts are in the bottom of the unit, and also the front as you face it. I also removed the power supply here as it made the whole thing easier. Most of the screws are all different sizes so it's fairly easy to work out where they go back, but its a good idea to write a note on a piece of paper and tape each screw next to it. You want to get to the point here where when you flip the unit over, the base of the case can be moved out of the way sufficiently for you to get at the wire on the PCB with your soldering iron. You don't want to be removing the motor at this point, but just keep an eye on the fragile hall sensor mounted to the back of it.
4. Now - and this will make our lives easier should we ever need to do this again - when you desolder the motor from the board (just the one wire), instead of the new motor solder a piece of wire in place of it. We can then solder the new motor to this wire and if we ever need to do this again we haven't got to go through the process of getting to the bottom of the PCB, we can just desolder the join in the wire. Now is a good time to take the new motor and plug that into the PCB via the two plastic plugs on the end of the leads.
5. Put the unit back the right way up and put all the bolts back in that you took out in step 3, and the PSU. You should now be back where you started, only with the lid off and the new motor connected to the PCB instead of the old one.
6. Now you can remove the motor by unplugging it from the PCB (if not done already) and unscrewing the 4 bolts to the front to remove it.
7. The pinion gear should just pop off the motor with a bit of force. The magnet on the opposite end will need a bit of the glue residue removing with a knife, and then with a bit of force it should also pop off. Also remove the hall sensor mount (big piece of plastic on back of the motor with PCB attached). Inspect for damage and be careful with the hall sensor, but also the sensor mount which is sometimes cracked or damaged. You may be able to get away with glueing any damaged parts, else a 3D replacement can be found on Google.
8. Put these items onto the new motor, using a tiny bit of glue on the magnet. Solder the stray negative wire on the motor to the wire that we joined to the PCB, using some tape or heat shrink to cover the join as appropriate.
9. Pop the new motor in, basically reversing the process you followed to take it out. Slide the pinion onto the belt and ensure that the belt tension is correct and the shallower fins on the motor are facing up (the case is a tight fit if you get it the wrong way round, but it will just about fit).
10. Check the belt tension feels as before, and that all bolts are tight.
11. Leave the glue to dry for a while, then use the TM recalibration tool (with no rim attached) to calibrate the new motor.
12. Consider that as these issues seem to be temperature related, preventing the same from happening again by increasing the airflow across the motor. A simple fix is to create a shroud around the motor to direct the air, but replacing/adding fans will also help.

Good luck!
 
Last edited:
Hi Andysan

I have a t300rs which had the same fault as yours, i could re-calibrate it, it would run great for 30 mins then get weaker until no FFB, then when starting up again it would just turn one way then violently bang of the stop until i re-calibrated it again.
Thrustmaster wanted £130 to fix as i was out of warranty (even though it had only had 3 months of use), I checked the hall sensor mount and that was fine so I got fed up and bought a fanatec, but it still bugs me that i may be able to fix it.

I have stripped it down to the point i need to remove the black wire from the bottom of the motherboard when i thought i would ask how your replacement is going before going further.

Also I am not really knowledgeable in these kinds of things so excuse me if it a dumb question but If this is the fix what exactly is causing the fault. The motor will work fine for a short time so can the motor be completely at fault?


Hey Man,

Thanks for getting in touch.

I've had zero issues since I replaced the motor, all working as it should. All I have done since is to attach a USBfan to the outside of the case, extracting air from inside the case via suction. I had tried all sorts of different internal fan mods and basically couldn't get anything to fit without sawing the case up, something I am not willing to do. I've probably put about 20 or 30 hours into it since the fix.

in terms of what is going on here, as I understand it - and there are others who may put me right if I am slightly off which is cool - the brushless motor has a magnet that is glued to the motor shaft. The hall sensor hanging off the end of the motor needs to know the orientation of that magnet in order for the motor to be driven correctly. What happens over time is that the adhesive that holds the magnet onto the shaft weakens, and under the heat and force of you using the wheel it starts to move around. The magnet then isn't in the position that the T300 thinks it should be in, so the motor can't be driven correctly. You can see a video of someone who has dissasembled the motor moving this around with a bit of force (below):

The TM recalibration software basically just works out where the magnet has moved to and recalibrates itself accordingly, however the next time you play it will loosen again and hence you lose the FFB. This is why, providing the replacement motor is sound it should fix your issue. It's also why I am attempting to keep the FFB as low as possible, avoid games that are potentially harder on the wheel (Pcars 1 I hear is notoriously hard) and also keep the wheel cool - whilst also leaving the power on a few minutes after a session to aid cooling further.

If you've got that far then it should be a fairly easy fix for you - you can even cut the black wire and solder the new motor onto it if you don't want to solder directly to the board. Just remember to use the recalibartion software and get all of the belt tensions OK and you should be good to go.

Cheers.

Magnet moving on shaft:
 
Thanks for the quick reply, I see what is going on now, going to see if I can get inside the motor while still attached to MB and re-glue, failing that I will get a new motor and see if I can install it without destroying MB.

Thanks for reply and taking the time to post your solution, it will help a lot of people out and save people £££ paying thrustmaster.

I will let you know how I get on soon.
 
Hey Shaun,

If it saves you the time, the motor is crimped closed at either end - they don't disassemble any way other than via a hammer. Some people have done it, but you're probably going to find it hard going compared to replacing the motor - and you'll probably have to remove it anyway.

Happy to help - there are loads of other people who know much more than I do, I've just learnt off them.
 
Yeah I have been trying to move the little metal lugs with a screw driver while still attached with no joy, I have ordered a motor now before I break something. At some point I will probably remove and have a look inside the old one just to see what is happening, just have to wait for delivery from China now.
 
Α small cutting disk with a dremel is also a solution but you must cover all holes so no cutoffs enter the inner part of the motor. This is the only way to ensure a clean removal of the top cover without damaging it. Damage to that part will result in the hall sensor base not sitting correctly after installation.
 
Well I am here back to report 2 month later :banghead: 7 weeks after ordering a motor from china it still had not arrived and seller could not provide tracking I gave up and found a uk seller on ebay, bit more expensive but sick of waiting, as with yours Andysan it does look like had something on the spindle but matched perfectly to the old motor.
I thought it would be a doddle to solder the small black wire but it turns out my iron was knackered, watched a tutorial on conditioning a soldering iron and the guy got one that looked like mine and binned it ,after sometime I got some heat into it and connected the black wire although I was convinced I had melted or contaminated the PCB.
Then it was just a case of remembering where things went and what screws went where (2 months later, I cant even remember 2 hours later).
Got it mounted to my playseat, calibrated and all works fine to my surprise, played in game and it again seems fine. I had not used the wheel for a year now and have a CSL now and the FFB did seem a bit light but I put it back to the force I used to play at (6 and 6 in GT Sport) and when you try and fully lock the wheel the force coming back is really strong and after 4 laps in TT mode beat my quali time from daily races last week on the fanatec which is embarrassing.
Just a couple of small issues you guys can maybe help with if you understand.

1. Does the T300 have a centre notch, where you can slowly rotate the wheel around where the centre should be and you can feel a slight click? I can not feel one and cant remember.

2. I have tested all the functions in the TM control panel eg Blown tyre vibration and they all work fine but in game I do not seem to have any real feedback if I hit a wall (on gt sport at least) , does this seem right, the fanatec nearly snaps my wrists and I can not remember if the t300 was like this? The motor seems fine but I am worried I may have damaged something else installing it or when I was running it broken last year, calibrating it every 30 mins with everything slamming back and forth cant do these things much good.

Hi I have the same problem with my T300. I will try to replace the motor.

Can you post the link where you bought the motor, I don't want to wait 2 months for the shipping from China.
Thanks!
 
Hi I have the same problem with my T300. I will try to replace the motor.

Can you post the link where you bought the motor, I don't want to wait 2 months for the shipping from China.
Thanks!
Hi i have been looking at the t300 the past few weeks and thought i need to post my findings...
Calibration issues:
Dont use the software tools its pointless..

If the wheel moves left to right at speed and power and wont ever calibrate then the magnet on the back of the motor is in the wrong place and the chances are it has twisted a small amount. It and the cog on the front on the motor has to be perfectly allined to calibrate.. That took me a while if figure but its as simple as that.. Super glue it. In place after..

The next fault is loss of power and slow calibration, one or the other.. The motor has come apart inside and needs. To be locked back in place.. The main shaft is surrounded buy a tube of Magnet and this comes loose.. Take apart motor and use 2pack adhesives to stick back in place.. It will be good as new..

Most problems with the thrustmaster is the parts wear and the soldering is shoddy.. They seem low quality under wr the hood.
 
Hi I have the same problem with my T300. I will try to replace the motor.

Can you post the link where you bought the motor, I don't want to wait 2 months for the shipping from China.
Thanks!
The motor is easy to take apart mate,. 3 wires to unsolder and a hammer..
 
Most problems with the thrustmaster is the parts wear and the soldering is shoddy.. They seem low quality under wr the hood
Not as shoddy as my soldering :dunce:

The next fault is loss of power and slow calibration, one or the other.. The motor has come apart inside and needs. To be locked back in place.. The main shaft is surrounded buy a tube of Magnet and this comes loose.. Take apart motor and use 2pack adhesives to stick back in place.. It will be good as new..

The motor is easy to take apart mate,. 3 wires to unsolder and a hammer..

I looked at trying this but was going to do myself an injury opening it with a hammer and screwdriver, I did not think I would get it together again even if I got into it so gave up, if I get bored enough on lockdown I might try and smash the old one open and see if that was the problem, its useless now anyway as I cut the wires on it.
 
My T300RS was working fine then started losing FFB and finally wouldn't calibrate. I moved the magnet into so called alignment - it has a mark on it or appears to which I lined up with the mark that was on the cog. It worked ok for a couple of laps then went mental again.

Assuming the magnet on the shaft is loose I ordered a new motor.

It came today. Easy to swap, I used a spade connector on the black wire. Obviously I've now lost alignment with the cog and magnet. However I just popped the cog back on as it only fits one way and superglued the base magnet onto the shaft. I read conflicting info on whether the two should be aligned or not...?

On turning on it continued to go crazy but at least it worked, in that my connections are sound and nothing has broken.

I found the calibration tool and to my surprise it sorted out the center and now it calibrates fine on my ps4. I've yet to try it in game.

I feel I need to re-update and use the software to see all is well, will try later. Hopefully it's fixed.

I have another T300RS which I dismantled. The stopper and case around the steering shaft is broken so I think this one is toast however all the other components seem to be in order bar the motor as I guess this is what happened to this unit. The hall sensor mount was broken also. Maybe I can sell the other parts to get some cash back!
No its all about the magnet and how may turn it count the cog doesn't matter thb unless the magnet is fixed and not turning on the shaft
 
No its all about the magnet and how may turn it count the cog doesn't matter thb unless the magnet is fixed and not turning on the shaft

Ok. I did wonder why the cogs from my 2 units have definite pen marks on them. The two are marked in different places however.

Anyway its calibrated so shall see how it goes!
 
Back