urunatural
Premium
- 261

- Piriapolis
- urunatural
great job Wayside, basic, efficient and very neat:tup:
Hi i have been checking your cockpit out in google sketch, awsome design but I was wondering If I could make it 1300mm instead of 1600mm?
how big are you? Im 5,8 and Im going to do some sort of cockpit but space is limited In my new house
great job Wayside, basic, efficient and very neat:tup:
I use it so much I havent had time to do the finishing work (want to paint and add ebrake)


its a great design
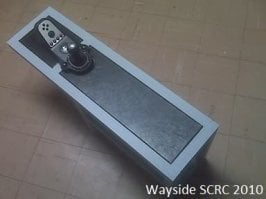
its 2 pieces of plywood with a piece of 2x2 (1.5x1.5) between them so the shifter can clamp to it


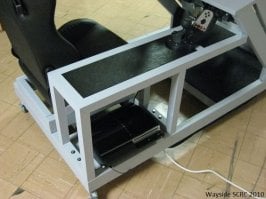
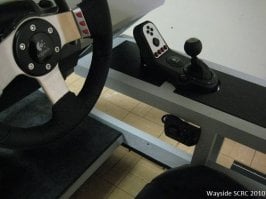
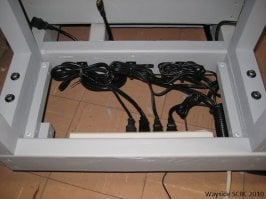
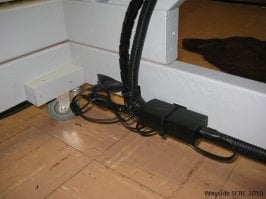
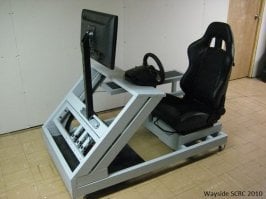
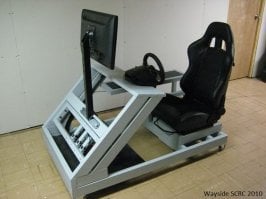
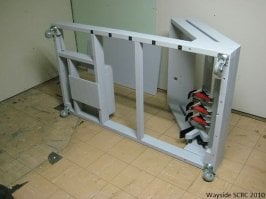
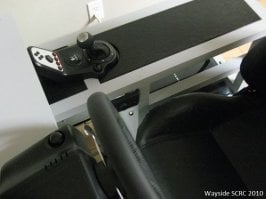
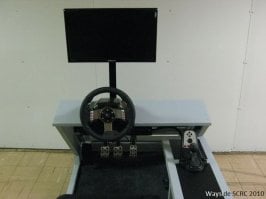
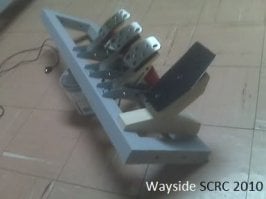
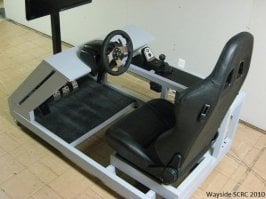
This is my interpretation of a Self Contained Racing Cockpit.
You will notice the design influences from Chilicoke's DIY cockpit. The simplicity of his design coupled with the real car feel that it appeared to provide is what made me say, I must have one of those.
That being said, I also wanted a self contained unit that was easy to move around. It had to be easy to get in and out of. The general construction costs had to be on the cheap and I wanted it to be something that anyone with a chop saw, skill saw, drill gun and some lumber could easily screw together.
Here are some pictures of the finished product:


Equipment used in this project:
-Logitech G27 Racing Wheel
-Logitech X 540 multimedia speaker system
-Hannspree 23'' Widescreen LCD 1080p
-Summit Racing Sport Seat w/Levers
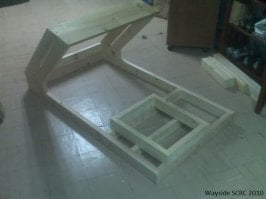
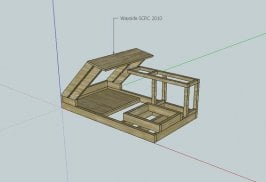
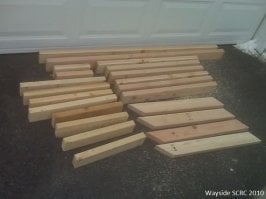
I used Google SketchUp to design the cockpit. Once I had it looking pretty good and the measurements made sense I went out to the garage and cut all the lumber for the basic frame in one shot. I assembled the basic frame and made sure the seat rails matched up and that the dash placement was good.


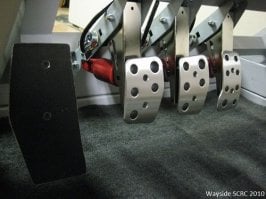
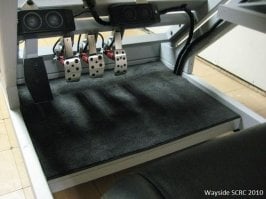
Next I was stuck waiting for the G27 to arrive. Once I received it I immediately pulled apart the pedals to built the pedal rack and double checked my measurements assuring the shifter would fit in the center console. The pedal rack is just a rectangle as wide as the front dash supports and tall enough to center the threaded ends of the pedals. Both items were built out of 1.5X1.5 square lumber and the inserts for the console were built from .75" plywood. The pedals were test fit using C clamps to make sure the position was perfect before they were bolted in place.


Getting the whole thing wired up was a little tough in the sense that I didn't want wires all over the place ruining the clean look of the cockpit. I was able to run all wires down the right side dash support and under the frame in a 1.5" wire loom. I created a space underneath the spot for the PS3 putting most of the mess 'under the hood'. Also (not pictured) the subwoofer that contains amplification for the rest of the speakers is mounted under the seat (you can see the shelf for the sub in one picture below).


Few notes: The monitor mount was from my weight bench. It was the part that held the elbow rest and I never used it. It was hanging in my garage and I saw it out of the corner of my eye and thought, "No way that is 45 degrees". The dead pedal was cut out of some thin steel and mounted with 2 cylindrical plastic washers on some 1.5" wood cut to match the shape of the Logitech pedals. The wheels are 3-Inch 150-Pound Swivel Double Lock Rubber Plate Casters from Amazon.
So thats my ride. Any questions, comments, things I could have done differently?
I know that DIY is not for everyone but if you are even thinking about giving it a try and have some basic wood working skills you can take a shot at this project for the cost of a few 2X4s.

I'll also include my Google SketchUp plans. Install Google SketchUp if you don't already have it and you can measure every aspect of this project and even edit some stuff if you wish.
View attachment 72446
Later,
-wayside[/QUOT
Pictures please
This is my interpretation of a Self Contained Racing Cockpit.
You will notice the design influences from Chilicoke's DIY cockpit. The simplicity of his design coupled with the real car feel that it appeared to provide is what made me say, I must have one of those.
That being said, I also wanted a self contained unit that was easy to move around. It had to be easy to get in and out of. The general construction costs had to be on the cheap and I wanted it to be something that anyone with a chop saw, skill saw, drill gun and some lumber could easily screw together.
Here are some pictures of the finished product:


Equipment used in this project:
-Logitech G27 Racing Wheel
-Logitech X 540 multimedia speaker system
-Hannspree 23'' Widescreen LCD 1080p
-Summit Racing Sport Seat w/Levers
I used Google SketchUp to design the cockpit. Once I had it looking pretty good and the measurements made sense I went out to the garage and cut all the lumber for the basic frame in one shot. I assembled the basic frame and made sure the seat rails matched up and that the dash placement was good.


Next I was stuck waiting for the G27 to arrive. Once I received it I immediately pulled apart the pedals to built the pedal rack and double checked my measurements assuring the shifter would fit in the center console. The pedal rack is just a rectangle as wide as the front dash supports and tall enough to center the threaded ends of the pedals. Both items were built out of 1.5X1.5 square lumber and the inserts for the console were built from .75" plywood. The pedals were test fit using C clamps to make sure the position was perfect before they were bolted in place.


Getting the whole thing wired up was a little tough in the sense that I didn't want wires all over the place ruining the clean look of the cockpit. I was able to run all wires down the right side dash support and under the frame in a 1.5" wire loom. I created a space underneath the spot for the PS3 putting most of the mess 'under the hood'. Also (not pictured) the subwoofer that contains amplification for the rest of the speakers is mounted under the seat (you can see the shelf for the sub in one picture below).


Few notes: The monitor mount was from my weight bench. It was the part that held the elbow rest and I never used it. It was hanging in my garage and I saw it out of the corner of my eye and thought, "No way that is 45 degrees". The dead pedal was cut out of some thin steel and mounted with 2 cylindrical plastic washers on some 1.5" wood cut to match the shape of the Logitech pedals. The wheels are 3-Inch 150-Pound Swivel Double Lock Rubber Plate Casters from Amazon.
So thats my ride. Any questions, comments, things I could have done differently?
I know that DIY is not for everyone but if you are even thinking about giving it a try and have some basic wood working skills you can take a shot at this project for the cost of a few 2X4s.

I'll also include my Google SketchUp plans. Install Google SketchUp if you don't already have it and you can measure every aspect of this project and even edit some stuff if you wish.
View attachment 72446
Later,
-wayside
That post is from 7 years ago and he hasn't logged in in 5 years. I don't think you'll be getting pictures any time soon.Pictures please
This is my interpretation of a Self Contained Racing Cockpit.
You will notice the design influences from Chilicoke's DIY cockpit. The simplicity of his design coupled with the real car feel that it appeared to provide is what made me say, I must have one of those.
That being said, I also wanted a self contained unit that was easy to move around. It had to be easy to get in and out of. The general construction costs had to be on the cheap and I wanted it to be something that anyone with a chop saw, skill saw, drill gun and some lumber could easily screw together.
Here are some pictures of the finished product:


Equipment used in this project:
-Logitech G27 Racing Wheel
-Logitech X 540 multimedia speaker system
-Hannspree 23'' Widescreen LCD 1080p
-Summit Racing Sport Seat w/Levers
I used Google SketchUp to design the cockpit. Once I had it looking pretty good and the measurements made sense I went out to the garage and cut all the lumber for the basic frame in one shot. I assembled the basic frame and made sure the seat rails matched up and that the dash placement was good.


Next I was stuck waiting for the G27 to arrive. Once I received it I immediately pulled apart the pedals to built the pedal rack and double checked my measurements assuring the shifter would fit in the center console. The pedal rack is just a rectangle as wide as the front dash supports and tall enough to center the threaded ends of the pedals. Both items were built out of 1.5X1.5 square lumber and the inserts for the console were built from .75" plywood. The pedals were test fit using C clamps to make sure the position was perfect before they were bolted in place.


Getting the whole thing wired up was a little tough in the sense that I didn't want wires all over the place ruining the clean look of the cockpit. I was able to run all wires down the right side dash support and under the frame in a 1.5" wire loom. I created a space underneath the spot for the PS3 putting most of the mess 'under the hood'. Also (not pictured) the subwoofer that contains amplification for the rest of the speakers is mounted under the seat (you can see the shelf for the sub in one picture below).


Few notes: The monitor mount was from my weight bench. It was the part that held the elbow rest and I never used it. It was hanging in my garage and I saw it out of the corner of my eye and thought, "No way that is 45 degrees". The dead pedal was cut out of some thin steel and mounted with 2 cylindrical plastic washers on some 1.5" wood cut to match the shape of the Logitech pedals. The wheels are 3-Inch 150-Pound Swivel Double Lock Rubber Plate Casters from Amazon.
So thats my ride. Any questions, comments, things I could have done differently?
I know that DIY is not for everyone but if you are even thinking about giving it a try and have some basic wood working skills you can take a shot at this project for the cost of a few 2X4s.

I'll also include my Google SketchUp plans. Install Google SketchUp if you don't already have it and you can measure every aspect of this project and even edit some stuff if you wish.
View attachment 72446
Later,
-wayside
