General Model Kit Building Thread

And for me to build this, which I've had on hand for probably 20 years! (Tamiya 1/12)
50903258251_221b264584_o.jpg

That thing is a beast!
Been eyeing the Jägermeister Porsche by Revell in 1/24 for a while now, but until I build up all the models I already have I'm banning myself from buying more. :lol:

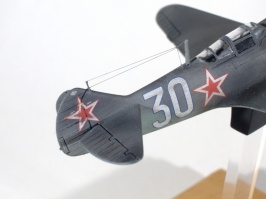
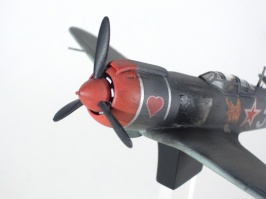
I'm working on a Lavochkin La5-FN in 1/72 right now and with the BMW done I'll go back to working on the HMS Bounty. Busy busy busy...
 
I didn't know this thread existed. I'm happy I found it because I'm getting myself into this hobby now and I might need some advice. I recently bought a few kits, plus a lot of tools.

This will be my first kit
20210330_170449.jpg

I've done some research, and although I am aware that AMT is probably the worst kit brand, I did read that this particular model is pretty well made. I have a soft spot for these older common cars/trucks, so I took the plunge.

I did not expect he parts to be so incredibly small. It took me about a week to finally finish the engine. There were a few rough spots and that thing called flash that needed to be trimmed and smoothed. It doesn't look even remotely as nice as some of the pro stuff I've seen here, but I am happy with the result.
20210326_140839.jpg

20210328_133238.jpg

20210330_164422.jpg

20210330_163540.jpg

20210330_163611.jpg


Did part of the frame as well. I just recently noticed my severe lack of paint, so I am improvising with what I got. Technically I could paint it as the manual says, which I have all the paints for, but I want to take some artistic liberty with it.
20210330_163125.jpg

20210330_163153.jpg


As for the body, I bought some Tamiya spray paints, plus primer. I do have a doubt though: Is it really necessary to prime the body? I've heard mixed answers. I did sand the body, which is something someone else recommended. Also, how many layers of paint is necessary and is it also necessary to apply a clear coat?
 
I do have a doubt though: Is it really necessary to prime the body?

If you’re going straight in with spray, a prime isn’t absolutely necessary. I’ve only ever primed models that I paint by brush with acrylic to give it a surface to stick to. Saying that, if you’ve sanded, a prime coat might help to further smooth out the surface. I no paint expert, keep in mind.
Just be sure to do several light passes over several coats to build an even paint coverage. If you want to base coat to help the top coat be brighter or more saturated that can be done, but like priming with aerosols, isn’t really necessary.
 
I didn't know this thread existed. I'm happy I found it because I'm getting myself into this hobby now and I might need some advice. I recently bought a few kits, plus a lot of tools.

This will be my first kit
View attachment 1001045
I've done some research, and although I am aware that AMT is probably the worst kit brand, I did read that this particular model is pretty well made. I have a soft spot for these older common cars/trucks, so I took the plunge.

I did not expect he parts to be so incredibly small. It took me about a week to finally finish the engine. There were a few rough spots and that thing called flash that needed to be trimmed and smoothed. It doesn't look even remotely as nice as some of the pro stuff I've seen here, but I am happy with the result.
View attachment 1001046
View attachment 1001047
View attachment 1001048
View attachment 1001049
View attachment 1001050

Did part of the frame as well. I just recently noticed my severe lack of paint, so I am improvising with what I got. Technically I could paint it as the manual says, which I have all the paints for, but I want to take some artistic liberty with it.
View attachment 1001051
View attachment 1001052

As for the body, I bought some Tamiya spray paints, plus primer. I do have a doubt though: Is it really necessary to prime the body? I've heard mixed answers. I did sand the body, which is something someone else recommended. Also, how many layers of paint is necessary and is it also necessary to apply a clear coat?
Watch some of this guy's videos. You can buy $2 paint at Walmart and it does a better job than $15 paint. Go to his channel. Tons of videos and how to's.
 
Last edited:
I didn't know this thread existed. I'm happy I found it because I'm getting myself into this hobby now and I might need some advice. I recently bought a few kits, plus a lot of tools.

This will be my first kit
View attachment 1001045
I've done some research, and although I am aware that AMT is probably the worst kit brand, I did read that this particular model is pretty well made. I have a soft spot for these older common cars/trucks, so I took the plunge.

I did not expect he parts to be so incredibly small. It took me about a week to finally finish the engine. There were a few rough spots and that thing called flash that needed to be trimmed and smoothed. It doesn't look even remotely as nice as some of the pro stuff I've seen here, but I am happy with the result.
View attachment 1001046
View attachment 1001047
View attachment 1001048
View attachment 1001049
View attachment 1001050

Did part of the frame as well. I just recently noticed my severe lack of paint, so I am improvising with what I got. Technically I could paint it as the manual says, which I have all the paints for, but I want to take some artistic liberty with it.
View attachment 1001051
View attachment 1001052

As for the body, I bought some Tamiya spray paints, plus primer. I do have a doubt though: Is it really necessary to prime the body? I've heard mixed answers. I did sand the body, which is something someone else recommended. Also, how many layers of paint is necessary and is it also necessary to apply a clear coat?

Man!! Off to a great start! AMT kits aren't the "best" when it comes to fit and finish, but looks as though you're doing fine.

As far as the paint question - you could get 10 different methods (opinions) from 10 different people. And concerning clear coat, the main reason to do this is to protect the decals, and of course the paint - just like on a real car. However, if you are keeping the model displayed in a case, temp controlled room, and out of direct sunlight (and it's not a race car with a boat load of decals) than I don't think it's completely necessary.

Best way to do the paint is to just do it, you'll get better over time. I got an airbrush about a year and a half ago - and painted with rattle cans for so long I think I still get a better finish from the cans, hopefully with more practice that will change.

Good luck and have fun - and keep those progress pics coming.
 
Not a kit, but a novel design and scratch built experimental rocket launched several times during the past week. It does not need a parachute or streamer, does not go ballistic and land nose first. It flips over at apogee, slides tail first, then goes horizontal, spinning and gliding sideways with possible Magnus Effect, and lands level to the ground.


Magnus X-1, horizontal spin recovery with Magnus Effect(?).
 
Last edited:
First off, thank you so much for the replies and the advice. I've been watching some of the suggested videos and it is amazing what you can do with an air brush. I will consider getting one next month and see where it goes from there. It will definitely help me with the small parts that I've been painting by hand, that aren't as clean-looking as I would've hope for.

Here's some progress on the Hilux! I've been going a bit slow since I ran out of thinner. Thankfully I came across a Hobby shop very close to where I live and I got some more, plus a ton of paints.

20210402_162604.jpg

This was the absolute hardest so far, but the frame, drivetrain and suspension components are about 90% done. Just missing the brakes, shocks and steering rack. I now understand why they say AMT kits have a bit of fitment issues. I'm learning as I go, by trimming parts and making them fit and align properly.
20210402_162758.jpg

Making the engine properly sit on the mounts and align with the driveshafts was almost a two hour ordeal. But it's done.
20210402_162640.jpg

The floorboard look rough on this side because it will not will be a visible part anyway. I just didn't want to leave it white, in case some of it might be visible from the interior.
20210402_162941.jpg

The exhaust was a bit crappy. Just a plastic stick. So I decided to get adventurous and drill the tip to give it a more "realistic" piped look. I'm really glad I did!

Next step is to detail the interior, build the steering elements and after that finally paint the body, wheels and tires. Can't wait to see this finish so I can move to my other kits.
 
It will definitely help me with the small parts that I've been painting by hand, that aren't as clean-looking as I would've hope for.

While that is true, you can get equally clean results with a paint brush if you thin your paint and apply multiple coats. It will take longer but it will look greater

👍


Next step is to detail the interior, build the steering elements and after that finally paint the body, wheels and tires. Can't wait to see this finish so I can move to my other kits.

That's great! We can't wait either :D 👍 👍 👍

Also as a side note for small interior details, such as switches, dials, etc, it would be easier to paint them with an acrylic pen, maybe check the hobby store for one.

If you can't find them, a guitar string or toothpick will do the job. (Guitar string/toothpicks are usually used for super glue applications in hard to get spots but the same principle can be applied with paints).
 
Last edited:
While that is true, you can get equally clean results with a paint brush if you thin your paint and apply multiple coats. It will take longer but it will look greater

👍


That's great! We can't wait either :D 👍 👍 👍

Also as a side note for small interior details, such as switches, dials, etc, it would be easier to paint them with an acrylic pen, maybe check the hobby store for one.

If you can't find them, a guitar string or toothpick will do the job. (Guitar string/toothpicks are usually used for super glue applications in hard to get spots but the same principle can be applied with paints).
You can use aluminum foil,all kinds of tips and tricks. I've been building models for 50 years. Go on YouTube,there are some really good tricks.
 
You can use aluminum foil,all kinds of tips and tricks. I've been building models for 50 years. Go on YouTube,there are some really good tricks.

The most recent trick I learned was using aluminum foil as your base for waves, and then applying a thin layer of moulding putty over it.

Something that simple blew my mind :lol: I can't wait to get into it this summer.
 
Last edited:
I now understand why they say AMT kits have a bit of fitment issues. I'm learning as I go, by trimming parts and making them fit and align properly.

AMT's fitment issues come not just from parts ...you know... not fitting, but from the fairly low quality (i.e. soft) plastic they use, which doesn't hold its molded shape well. The frame picture in post 1384 above has such an obvious twist in it, along with the front not quite being actually in front of the rear, but significantly offset to the right. They used to have a 1/25th line of big rig trucks that I built a lot of back in the day, but they were hard to make look good!
 
AMT's fitment issues come not just from parts ...you know... not fitting, but from the fairly low quality (i.e. soft) plastic they use, which doesn't hold its molded shape well. The frame picture in post 1384 above has such an obvious twist in it, along with the front not quite being actually in front of the rear, but significantly offset to the right. They used to have a 1/25th line of big rig trucks that I built a lot of back in the day, but they were hard to make look good!

Honestly for a first kit, it won't matter too much. It's a gateway into the hobby, they're having fun so it's all that matters 👍
 
AMT's fitment issues come not just from parts ...you know... not fitting, but from the fairly low quality (i.e. soft) plastic they use, which doesn't hold its molded shape well. The frame picture in post 1384 above has such an obvious twist in it, along with the front not quite being actually in front of the rear, but significantly offset to the right. They used to have a 1/25th line of big rig trucks that I built a lot of back in the day, but they were hard to make look good!

I totally agree with this. I just got a few Tamiya kits and compared the overall feel of the plastic, as well as the finish. It is completely different. The "definition" (let's call it) in the cuts is far better and there is virtually no flash or markings form the plastic molding.

Although I really haven't had any major issues with this AMT kit. I see what you say about the frame, but I think it's the angle of the picture. The frame is pretty straight and although it was a bit of a nightmare to assemble all the drivetrain and suspension components, everything ended up fitting just fine. Except for part of the exhaust pipe that was a bit short for some reason. This is my first, but probably also my last AMT kit as I haven't found another one with good reviews. I just fell in love with this little Toyota and had to give it a chance. I was interested in the semi trucks AMT has as well, but I've read that it's better to go with Revell for this kind of vehicle as they are plagued with issues you mentioned above, like fitment and overall quality of the plastic.

I did more progress today. Almost finished the interior, except for a few parts. Also completed the rear end, exhaust and also a fitment test with the body. Everything seems to be going well.

20210403_165913.jpg

20210403_170202.jpg

20210403_165721.jpg

20210404_020620.jpg

20210404_020640.jpg

20210404_021039.jpg


Obviously I have not glued the body yet. This is for testing only. I'm really happy to see that it's starting to look like a truck now.
 
The problems you're having are not exactly AMT's fault. This kit was originally manufactured by Lindberg almost 30 years ago and reissued by Round 2 models (AMT) recently. Most all of Lindberg's kits have shown to have poor engineering and parts fit. There is also a good chance yours was molded in China which would account for the rubbery plastic. Revell has the same problem. As for the frame fitting "pretty good", it may have been pulled from the mold too quick and developed a warp. No manufacturers are immune to this.

Another word about the quality of the plastic. As environmental restrictions increase, formulation of plastic has to change. Kits molded in the US can suffer from rubbery, translucent, or shattering plastic. Some require a primer barrier to keep paint from crazing the plastic. Many recent Revell or Monogram kits won't tolerate anything but water-based paint without priming first. If the kit was molded in China, who knows what the plastic is. I've heard anecdotal evidence that it's somewhat resistant to glue.

Anyway, thanks for reading my diatribe. I'm looking forward to seeing your progress with this. I like it, you're doing a great job!
 
I totally agree with this. I just got a few Tamiya kits and compared the overall feel of the plastic, as well as the finish. It is completely different. The "definition" (let's call it) in the cuts is far better and there is virtually no flash or markings form the plastic molding.

Tamiya's finish is like lego. All the parts damn near snap together. Almost unparalleled finish :embarrassed:
 
Last edited:
Completely slipped my mind that I've not posted this here.

1/72 scale Lavochkin La-5 FN. This is a 70s Italeri kit, so it needed rescribing due to all the raised details. Other than that the kit went together fine. I decided to model it with raised landing gear, so I made a stand for it and used magnets to attach the model. No holes or anything needed to keep it in place, which is cool. I also got a decal set for it which cost about twice as much as the actual kit. :lol:

DSCN1678.JPG


DSCN1682.JPG DSCN1686.JPG DSCN1684.JPG


I'm also still working on that HMS Bounty kit I started aaaages ago.

DSCN1695.JPG


Rigging on it has begun, this picture is before I started the time consuming job of doing these...

20210407_231232.jpg


Those deadeyes (the plastic donuts) are actually hand made from some plastic jewellery beads and hand threaded. PE chain finishes it off nicely. It is about as fiddly and time consuming as it looks. They're a bit floppy right now, but when the side stays are in place they'll look the part.

I've also started work on a BMW Z1 kit from Revell. It needs a lot of work though because the panel fit is not great.
 
When I was younger I did quite a few model kits as it was a somewhat cheap hobby and there was a small hobby store within biking distance that had a section dedicated to model kits (not sure if it's even around still, I kind of doubt it though). I kind of lost interest as I got older though since I moved away from that nice little store and model kits weren't as convenient (plus money was extremely tight). Fast forward to today and I'm bored and wanting to do something car related besides driving virtual ones so I decided to get back into modeling. I decided to go with a Grand National/GNX kit as I won't feel terrible if I mess it up and if I don't I'll have a nice model.

DSC_0186.JPG


I still have to go and get the cement, paint, and tools, but I'm excited to get started. :cheers:
 
I know this is my first, but I didn't expect it to be this difficult. I'm close to being done, but not without making a lot of mistakes. The paint specifically was a nightmare. After this model, I'll practice with a really cheap kit I got from ebay and follow more tutorials on how to properly polish and finish the paint job. I'm also considering investing in a airbrush and practice with it to get a better results with smaller parts.

20210405_190635.jpg

Learned a little trick on how to strip that ugly chrome paint. Just some warm water and a few drops of bleach. I could literally see the chrome disappearing.
20210405_191622.jpg

Only after a few minutes and it was gone.
20210409_144523.jpg

I am so glad I had bad feeling about the chrome wheels. Gray looks so much better. They were really tricky to paint though!
20210410_141947.jpg

So here's my first mess up. Although I love this blue, I didn't polish it properly and it isn't as glossy as I would've hoped. I thought I could skip the sanding step and just use a 2-step polish/scratch removal kit I have for my car. And although it brought quite a lot of shine from it, it failed to get rid of the orange peel. Lesson learned.
20210412_202842.jpg

My masking skills are obviously terrible. Although the gaskets for the side windows came out nice, the curved windshield proved it isn't that simple. I need to get flexible masking tape. Thankfully the dark color hides the mess.
20210412_203023.jpg

20210412_203200.jpg

Other than that, I'm super happy that the body actually fit the chassis without any issue. There were a lot of really difficult bonding points, but it dropped nicely. Last steps are the steering elements, brakes, wheels(that are ready to be mounted), front and rear bumper. I might install the rollbar. We'll see.
 
I think you're too critical with yourself. The wheels and paint look good! I spend a whole lot of time on model car forums, and believe me, you're work is a whole lot better than many I've seen. :cheers:
 
@HuskyGT please try to get a decent airbrush. Don't buy a cheap one. You need to learn it, and the only way to learn the techniques is by practicing. You can't practice effectively with an airbrush that isn't comfortable to use, has defects, or needs constant maintenance to work (aside from the regular cleaning).

If you don't want to budget out a proper airbrush/don't intend on sticking with the hobby for too long then get a cheap one. If you absolutely need to buy a cheap one, please make sure it's a dual action trigger. It can be gravity well, pump, pistol grip, whatever the case, just make sure it's dual action.

Dual action triggers give you more control because you first press down on the trigger to release air, and then you pull back on the trigger to release paint. This is important, because it allows you to dry the model while painting, but also allows you to avoid spider webs and splotches all over your model.


Keep going, the model looks great 👍
 
I'm getting there! It's finally standing on its shoes.

20210415_142329.jpg

20210415_142812.jpg

I don't have to say how much of a nightmare it was to paint the black trim inside the grill, around and inside the Toyota logo and the "V6" badge. Not perfect, but not too terrible. I have to figure out a way to mask difficult areas like these in future builds.
20210415_142803.jpg

20210415_143016.jpg

20210415_142636.jpg

20210415_142742.jpg

20210415_143114.jpg


Just need to paint the handles for the doors and tailgate. Also put the rear bumper on. I accidentally scratched the chrome part of the bumper when clearing some flash and I've had a really hard time figuring out how to fix it. I definitely cannot paint it by hand as it would look really messy, and I don't have chrome paint (I don't even know if they sell it). I don't think I have the patience for waiting for more paint, so I'll probably have to go with body color... I'm in a bit of a panic.
 
I don't have to say how much of a nightmare it was to paint the black trim inside the grill, around and inside the Toyota logo and the "V6" badge. Not perfect, but not too terrible. I have to figure out a way to mask difficult areas like these in future builds.

Just need to paint the handles for the doors and tailgate. Also put the rear bumper on. I accidentally scratched the chrome part of the bumper when clearing some flash and I've had a really hard time figuring out how to fix it. I definitely cannot paint it by hand as it would look really messy, and I don't have chrome paint (I don't even know if they sell it). I don't think I have the patience for waiting for more paint, so I'll probably have to go with body color... I'm in a bit of a panic.


Enamel paints are your answer for small details. That grille section would go smoother with an enamel wash (really diluted enamel paint). Reason being, the surface tension of the paint is so low, that it finds it's way through the model.

Enamel washes are used for:
  • highlighting details like panel lines - Tamiya has a product for this exact case called Panel Liner
  • creating subtle dust/dirt/mud effects
  • image occlusion (shading/shadow casting)
But for your case with the grill, you could use any black enamel paint and dilute it a little, not too much to make it a wash, but just enough to lower the surface tension so that it's easier to apply.

If you make a mistake, wipe it off with white spirit.


For masking, Tamiya sells two different types of masking tapes. One is extremely fine (white), the other is normal modeler's masking tape (yellow). Cut them to size on your board and then apply them on your model. Just need to have some patience.

Now, the little scratch on your roll bar isn't that big of a deal. You can pass that off as a scuff mark, wear and tear, or grime depending on how you approach it. Some mistakes end up adding more to your build.

I'm not going to bog you down with a slew of videos to watch but here's two that will help you in some way:

For reworking:


For repair/do-over:


To repair using the chrome foil/chrome paint method, paint the part a gloss black before applying the chrome paint. You should be set after that.


Don't panic, this is your canvas, you can do whatever you want with it. If some idea didn't work out because of a mistake, then try to make the best of it, or take the project in a different direction (like you did by making it a body color instead of keeping it chrome).


You're doing great! Keep at it 👍
 
Last edited:


Enamel paints are your answer for small details. That grille section would go smoother with an enamel wash (really diluted enamel paint). Reason being, the surface tension of the paint is so low, that it finds it's way through the model.

Enamel washes are used for:
  • highlighting details like panel lines - Tamiya has a product for this exact case called Panel Liner
  • creating subtle dust/dirt/mud effects
  • image occlusion (shading/shadow casting)
But for your case with the grill, you could use any black enamel paint and dilute it a little, not too much to make it a wash, but just enough to lower the surface tension so that it's easier to apply.

If you make a mistake, wipe it off with white spirit.


For masking, Tamiya sells two different types of masking tapes. One is extremely fine (white), the other is normal modeler's masking tape (yellow). Cut them to size on your board and then apply them on your model. Just need to have some patience.

Now, the little scratch on your roll bar isn't that big of a deal. You can pass that off as a scuff mark, wear and tear, or grime depending on how you approach it. Some mistakes end up adding more to your build.

I'm not going to bog you down with a slew of videos to watch but here's two that will help you in some way:

For reworking:


For repair/do-over:


To repair using the chrome foil/chrome paint method, paint the part a gloss black before applying the chrome paint. You should be set after that.


Don't panic, this is your canvas, you can do whatever you want with it. If some idea didn't work out because of a mistake, then try to make the best of it, or take the project in a different direction (like you did by making it a body color instead of keeping it chrome).


You're doing great! Keep at it 👍


OH! You mean this thing? I totally forgot I had bought it. I thought of using it for the door gaps and fuel door to simulate separate panels.
20210415_171418.jpg


Thank for the advice though. Now I know I can use it for other difficult areas as well.

EDIT, so I fixed the bumper, by painting it body color. It's the upper section of the front bumper which is supposed to be chrome. Honestly? It looks pretty good in body color! I didn't expect it at all. Sometimes you can't really know how something will turn out until assembled.
20210415_172209[1].jpg
 
Last edited:
OH! You mean this thing? I totally forgot I had bought it. I thought of using it for the door gaps and fuel door to simulate separate panels.

Yea you can use it for that. I wouldn't use it for the grill portion (on the next project) as it's too diluted. But for what you mentioned, yes exactly that. Anything that has gaps/lines that you want to accentuate.
 
Last edited:
I know this is my first, but I didn't expect it to be this difficult. I'm close to being done, but not without making a lot of mistakes. The paint specifically was a nightmare. After this model, I'll practice with a really cheap kit I got from ebay and follow more tutorials on how to properly polish and finish the paint job. I'm also considering investing in a airbrush and practice with it to get a better results with smaller parts.

View attachment 1004065
Learned a little trick on how to strip that ugly chrome paint. Just some warm water and a few drops of bleach. I could literally see the chrome disappearing.
View attachment 1004066
Only after a few minutes and it was gone.
View attachment 1004067
I am so glad I had bad feeling about the chrome wheels. Gray looks so much better. They were really tricky to paint though!
View attachment 1004068
So here's my first mess up. Although I love this blue, I didn't polish it properly and it isn't as glossy as I would've hoped. I thought I could skip the sanding step and just use a 2-step polish/scratch removal kit I have for my car. And although it brought quite a lot of shine from it, it failed to get rid of the orange peel. Lesson learned.
View attachment 1004069
My masking skills are obviously terrible. Although the gaskets for the side windows came out nice, the curved windshield proved it isn't that simple. I need to get flexible masking tape. Thankfully the dark color hides the mess.
View attachment 1004070
View attachment 1004071
Other than that, I'm super happy that the body actually fit the chassis without any issue. There were a lot of really difficult bonding points, but it dropped nicely. Last steps are the steering elements, brakes, wheels(that are ready to be mounted), front and rear bumper. I might install the rollbar. We'll see.

I've been building models for over 10 years now and I still find that getting a good polish is extremely tricky. For a first time kit you've done an exceptionally good job. You're already at a level some people never even reach despite building models for years.
You've already learned that to remove orange peel you'll need to actually sand and not just polish. Once you do that you quickly learn that it's very easy to sand through the clear coat/paint.
Going forward, you've already expressed interest in an airbrush, so that's a good first step as it's much easier to minimise orange peel with one versus spray cans. Then my method for finishing off a model is using some fine sand paper (2000 grit in my case) and water sanding problematic areas (you might not need the sandpaper if the orange peel isn't too bad). After that I move onto my set of micromesh cloth, which is essentially like finer sandpaper. Then finally I use tamiya polishing compounds to finish the model off. You could get away without the micromesh cloth, but you'd spend ages polishing away the sandpaper scratches and it's just not worth the time. I will stress again that it is very easy to sand through the clear coat/paint. I've done it with just polishing compound and it's not fun.
My tips to avoid it are: 1) Use a lot of clear coat. 3, 4 or I've even done 5 layers of clear coat. Thick enough to be shiny and even, but not too thick to avoid it running. (At the same time of course, you don't want too much clear coat to start ruining the detail. This sort of thing takes practice...)
2) Wait a good amount of time for the clear coat to cure. My rule of thumb is at least a week after the last layer of clear coat. Ideally more, though it depends on the brand and type of clear coat you're using (For example, I've used Vallejo clear coat from a spray can that's not dried fully hard in over a month).

I'm getting there! It's finally standing on its shoes.

View attachment 1004810
View attachment 1004811
I don't have to say how much of a nightmare it was to paint the black trim inside the grill, around and inside the Toyota logo and the "V6" badge. Not perfect, but not too terrible. I have to figure out a way to mask difficult areas like these in future builds.
View attachment 1004812
View attachment 1004814
View attachment 1004815
View attachment 1004816
View attachment 1004817

Just need to paint the handles for the doors and tailgate. Also put the rear bumper on. I accidentally scratched the chrome part of the bumper when clearing some flash and I've had a really hard time figuring out how to fix it. I definitely cannot paint it by hand as it would look really messy, and I don't have chrome paint (I don't even know if they sell it). I don't think I have the patience for waiting for more paint, so I'll probably have to go with body color... I'm in a bit of a panic.

Grill looks good to me! With car models I find that there are often areas that either require a large amount of time to mask, or an equally large amount of time to carefully hand paint. There aren't really shortcuts. For this particular model you could use a black wash like was already suggested and it'd work nicely for the toyota badge and the V6, but it still leaves you at either hand painting or masking off the rest of the grill. Car models are full of these areas; engine details, interiors, drivetrain... But you seem to have the hang of it.

EDIT:
Just as some general advice to everyone, I see talk about making enamel wash by diluting model paint. That totally works and is good advice, but for anyone that hasn't tried it, try and use oil paints. Any artists oil paints will work. They are very high in pigment making them ideal for making washes and they dry very slowly, giving you plenty of time to work with them. You can dilute them with either turpentine or white spirit. The former giving you an even longer drying time.
In fact, I'm pretty sure that a lot of the washes that are specifically aimed at model builders are just that. Pre-diluted oil paint at a hefty markup.
Plus you can use oil paints for a variety of other techniques, like dot filters.
 
Last edited:
Back