- 1,440

- The Motherland
- Manasseh257
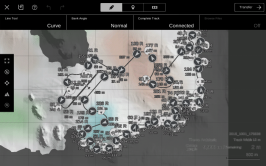
There's a lot to improve on this app, one of those is to place the sector splits exactly where we want them.
This x3! I'm gonna need PD to stop putting a sector split .7 miles from the finish line...

There's a lot to improve on this app, one of those is to place the sector splits exactly where we want them.
I wonder if there is a pattern to the sectors... Distance or turns. I doubt it's anchor points.
I honesty haven't looked at sector times on a custom track yet.Think it has to do with distance. The longer I make my first turns or straights, the farther down the track my first sector moves.
I honesty haven't looked at sector times on a custom track yet.
Do the number of sectors cap out at a particular number or is it a fixed number? Say 3, 4 & 5 sectors depending length. So much if this app is linked to distance it would make sense the sectors would be too.
")


How long before PD think you guys are having too much fun and patch it out? they did it in GT5 which annoyed a lot
")
Sorry for the delay, some real life happened; I actually made some really fast findings, just didn't have time to make a post about it.
I'm pressed for time so I'm not gonna go ham on the formatting of this one, sorry if that's an issue. Additionally, I didn't see a lot of need to photograph the findings I found - you'll understand why.
1).
After starting a course on Death Valley, I immediately found that the course laying methods and algorithms are the same as Eifel Flat - so I have reason to believe that I can confirm it to be universal across all themes.
2).
I have confirmed that any track laid on level terrain can be made into a rough terrain-type course. Keeping a realistic road surface becomes increasingly difficult when track is laid on jagged terrain or an increasing hill gradient - and this is in addition to the functions of realism I found in my last few findings (banking, track width, anchor placement, etc.).
3).
I can re-confirm that laying dense anchors on steeper hill gradients create larger bumps/jumps. Darker/lighter terrain coloring hints at the gradient severity:
View attachment 461198 View attachment 461199 View attachment 461200
However, there's more to it:
4).
I started a layout, and I was planning on publishing it immediately like my first few tests, but I wasn't 100% satisfied with the way the jump came out - there was a slight kink that usually made you bump the right-hand wall unless you went waaaay off the recommended driving line. So, I decided to straiten the section out, slightly adjusting the rotation and position of a few anchor points, but when I transferred the new version, the thing got completely changed. The initial jump was flattened out, and the second bump was far more severe. The original sort of "launch and catch" set up was entirely different, and not really fun. Unfortunately my iPad died and I wasn't able to undo. So, I tried moving the anchors back to their original position - and again, got entirely different results. I still feel the original variant was my best one, but this is the version I settled on (which was the upward-of-like-15 adjustments):
View attachment 461171 View attachment 461172
I still haven't published it 'cuz I haven't settled on my favorite banking severity yet, and I still want to test a low-downforce car. But what I've found is that even though it's confirmed that extreme elevation changes cause more extreme jumps/bumps, even just the slightest adjustment can create drastically different results for jumpy/bumpy terrain - so if you aren't satisfied with a layout (be it an attempt for realism, rough terrain, or chaotic jump maps), just play around with anchor placement, and you may find something you like/prefer. It's hard to say if there's really any sort of method to follow because of the level of intricacies you can make with the adjustment tools.
I'll try to get this one published tonight. My tests are largely gonna go back to elevation/map exploring to see which areas and track placements allow the most extreme track conditions, but there's a few smaller things for me to examine as well. I wouldn't be surprised if other unexpected things pop in the process, as they have for most every test I've made so far.
As for the OP, I know for certain I won't have any time to meddle with it until Thursday or Saturday this week. I will be trying to make that one of my priorities, though. There's a lot to go through.