
You are using an out of date browser. It may not display this or other websites correctly.
You should upgrade or use an alternative browser.
You should upgrade or use an alternative browser.
Assetto Corsa PC Mods General DiscussionPC
- Thread starter daan
- 141,857 comments
- 39,339,324 views
- 5,630

- Belgium
Doesn't exist for AC afaik...Hi, I'm looking for the Aspern circuit. I can't find it, does it exist for AC?
- 402

- Canada
As it happens, my problems with the wrong bridge #s 2&3 were solved by a fresh install of Brands, after which the intended 1970 bridge signage was working. Too many configs from various add-ons, I suspect. So if, when you have selected the 1970 layout and the 1970 skin, you are still seeing the modern day Brands logos on bridges 2&3, read on. (Or re-install ks_Brands...)
Re: Brands Hatch 1970 Skin
It was still sporting the newest Brands Hatch logo on the 2nd & 3rd bridges... I searched here <https://logos.fandom.com/wiki/Brands_Hatch_Circuit> , finding the logo for that year. I couldn't confirm that year's logo was on the bridges, but safe to say the current Brands logo wasn't (Immersion Buster). The attached file drops the old logos into the 1970 skins folder in ks_brands_hatch, so you need to have that skin loaded already, oc.
CORRECTION: I got wrong the first time. The sign shown here is from the 1963-1969 Brands Hatch. If that's useful to you, back it up, because it will be replaced with the 1970 version.
The skin: https://www.overtake.gg/downloads/brands-hatch-1970-track-skin.66996/


The correct 1970 version is here:
 www.gtplanet.net
Re: Brands Hatch 1970 Skin
It was still sporting the newest Brands Hatch logo on the 2nd & 3rd bridges... I searched here <https://logos.fandom.com/wiki/Brands_Hatch_Circuit> , finding the logo for that year. I couldn't confirm that year's logo was on the bridges, but safe to say the current Brands logo wasn't (Immersion Buster). The attached file drops the old logos into the 1970 skins folder in ks_brands_hatch, so you need to have that skin loaded already, oc.
CORRECTION: I got wrong the first time. The sign shown here is from the 1963-1969 Brands Hatch. If that's useful to you, back it up, because it will be replaced with the 1970 version.
The skin: https://www.overtake.gg/downloads/brands-hatch-1970-track-skin.66996/
The correct 1970 version is here:
Assetto Corsa PC Mods General Discussion
I got a CM update today , (and didn't change anything I think), and now I have this blue patch where the sky isn't rendered ... and it follows wherever I look. (Quest3 w Link cable using Oculus Rift render mode in video options, on Single screen rendering I don't see this) Anyone...
www.gtplanet.net
Attachments
Last edited:
- 96

- South Africa
Hi Guys
Here is my texture update for the Audi V8 Quattro Evo DTM car.
Installation:
Update details:


Click below to download update:
Here is my texture update for the Audi V8 Quattro Evo DTM car.
Installation:
- Copy my textures in the ClimaxF1_t78_v8_dtm_textures_update folder into each skins folder
- Copy the Dunlop folder in my Dunlop_Tires_update into the cars extention folder as per my update
Update details:
- Reworked metal_detail texture and upscaled
- New PlasticDetail texture and upscaled
- Reworked scratches texture and upscaled
- Reworked V8Evo_blackalu and upscaled
- New V8Evo_BODY_MAP and upscaled, also added surface brur to remove any bad surfaces
- New V8EVO_carbon texture and upscaled
- New V8EVO_carbon_N texture and upscaled
- Reworked V8EVO_INT_CAGE texture and upscaled
- Reworked V8EVO_INT_PAINT texture and upscaled
- New V8Evo_LEATHER texture and upscaled
- New V8Evo_LEATHER_B and upscaled
- Reworked V8EVO_LIGHTGLASS texture (exterior lights) and upscaled
- Reworked V8EVO_PARTS (all interior textures) and upscaled
- Reworked V8Evo_redfabric texture and upscaled
- Upscaled V8Evo_redfabric_b texture
- Reworked V8Evo_RIM texture and upscaled
- Reworked V8EVO_WOOD texture and upscaled
- New Dunlop tire textures added and upscaled
- New Dunlop tire B textures added and upscaled
Click below to download update:
Last edited:
Hello guys.
i've a situation that is driving me crazy.
I'm trying to make races with 1/3 of the real race laps and 3 times the tyre consumption, but no matter what i try the ai start pitting when they shouldn't.
i've even removed the ai consumption, but they still pit, sometimes the same ai when they start pitting, it stops every lap on the race.
I don't know what might be doing this.
I've seen this behaviour on rss formula americas, but i don't know if it's because of that car or some sort of bug in the game.
Checking the log file on Assetto Corsa/logs folder i could see the following line multiple times
STINT IS OVER FOR CAR: 5 REQUESTING PIT STOP, FUEL:70.0 FUELLAPS: -1.0
But i don't know what that mean.
Can someone help me ?
Thanks
- 1,315

- United States
Fooling around with the vhe_hockenheim track. I forgot how much I like to drive this track. Most things are being done via track skins at the moment so I don't forsee the need to make a separate track. Plus, it will be easy to go back to the stock look if you don't like the changes by simply deleting the track skins. What is being done through the config file are things that people may want even if you don't use the track skins.
-- Config changes include real time car numbers on the digital leaderboard and live jumbotron displays (not shown in the images) as well as track lights when it rains.
-- Track skins include new grass textures, altered normals for the tree shader to fix the weird shadowing and a few ambient and diffuse adjustments.
I still need to work out the grass and tree brightness to try and match how the track looked originally, but I like the changes so far.
Before:

After:

Before:

After:

-- Config changes include real time car numbers on the digital leaderboard and live jumbotron displays (not shown in the images) as well as track lights when it rains.
-- Track skins include new grass textures, altered normals for the tree shader to fix the weird shadowing and a few ambient and diffuse adjustments.
I still need to work out the grass and tree brightness to try and match how the track looked originally, but I like the changes so far.
Before:
After:
Before:
After:
- 811

- Spain
Any excuse is good for some good music... 😙View attachment 1391795
I don't know why, but the sun looks like this in LCS mode ^_^
- 239

- Germany
Someone already tried one of these?
Maybe someone could upload a "filled" excel file for both versions as I dont have access to my computer atm.
 www.overtake.gg
www.overtake.gg
Thank you!
Maybe someone could upload a "filled" excel file for both versions as I dont have access to my computer atm.
AC Cars and Tracks Technical Data (Excel 2013)
Attached is my Excel 2013 spreadsheet that includes all the cars and tracks in Assetto Corsa 1.11 with technical data from within the game (including the Dream Pack 1, 2 & 3, Japanese Pack, Red Pack and Tripl3 Pack, Porsche Pack I-III plus all...
www.overtake.gg
AC Cars+Tracks TecSpecs ExcelScanner
Based on the awesome "AC Cars and Tracks Technical Data (Excel 2013) 1.11", I made my own with some vba stuff. It works on click of a button, is reasonably fast and contains some macros. For inspection, the macros are included as textfiles too...
www.overtake.gg
Thank you!
- 1,078

- Australia
F1 2012 McLaren MP4-27 skinpack, with the various logo changes on the rear wing.
Britain (different Lucozade logo)

Hungary (maximuscle / black tooned)


India (boost energy drink / red tooned)


and a couple more.

 mega.nz
Britain (different Lucozade logo)
Hungary (maximuscle / black tooned)
India (boost energy drink / red tooned)
and a couple more.
351.19 MB file on MEGA
- 467

- @home
Thanks for the logo web site joined their Discord. Please GTmembers let me know if there more from the real old period logo and advertising board sites, prefer from the roaring 20’s and depressing 30’s.Re: Brands Hatch 1970 Skin
It was still sporting the newest Brands Hatch logo on the 2nd & 3rd bridges... I searched here <https://logos.fandom.com/wiki/Brands_Hatch_Circuit> , finding the logo for that year. I couldn't confirm that year's logo was on the bridges, but safe to say the current Brands logo wasn't (Immersion Buster). The attached file drops the old logos into the 1970 skins folder in ks_brands_hatch, so you need to have that skin loaded already, oc.
The skin: https://www.overtake.gg/downloads/brands-hatch-1970-track-skin.66996/
View attachment 1391854View attachment 1391855
Do not know if it’s historical right but with the help of 3Dsimed I also removed the modern gravel to grass, including the right sound.
Last edited:
- 467
- @home
thanks, only keep in your mind only not for multi monitors and VR setup, see the notifications in 2.5-1 versionJust a small tip for people looking for good reflections (either cockpit or outside), in CSP settings, extra FX, the results are way better using the Local reflections SSLR set as Quality : High (OLD) and you can manually set the resolution to 500% (despise the limit with the mouse being 100%). Doesn't seem to have any impact on performances. It fixes the "bulky pixellated" effect on rounded areas as well.
In case, here's a direct CSP Extra FX link : https://acstuff.club/s/Ceg9
We figured that out looking for the lack of reflections of the cockpit board on the porsche Speedster A356 from @alexlockout a friend was experiencing.
View attachment 1391512
Last edited:
- 230

- Norway
I've been using Gimp to edit and create skins for quite some time, and I've become fairly familiar with working with layers, masks, paths and so on.
But one thing has been on my mind for some time: What is the easiest way to distort/transform images to fit inside a selection? Often I want to fit an image into a selection I have made with the lasso tool, to follow polygon lines in the skin template.
Usually I can get away with using some of the transform tools, or just cutting the image into two or more pieces, then rotating the pieces to fit, really simple and manual approach. But I keep thinking there must be an easier way to do this?
How do you guys do it?
- 32

- France
Just came across this on the AC Reddit:
Its currently only for that one car but man that looks interesting.
do we need to be constantly subscribed to the patreon to use the ECU ?
there is so many tiers, it's a bit overwhelming.
- 413

- Finland
Re: Brands Hatch 1970 Skin
Great work man.
Any chance of doing the 80's skins? A lot of F1 seasons need it. I have used the 90's skins which are ok but proper 82-87 skins would be nice.
- 413
- Finland
A REQUEST:
Can any of the "gurus" check out why this Senna 1993 helmet is not showing properly.
The correct yellow helmet is in the /skins folder but no cigar.


Can any of the "gurus" check out why this Senna 1993 helmet is not showing properly.
The correct yellow helmet is in the /skins folder but no cigar.
f1_1993_mclaren
MediaFire is a simple to use free service that lets you put all your photos, documents, music, and video in a single place so you can access them anywhere and share them everywhere.
www.mediafire.com
- 216

- Derby, UK
- RicME85
- RicME85
Very basic GIMP user here, mostly use Paint.net.I've been using Gimp to edit and create skins for quite some time, and I've become fairly familiar with working with layers, masks, paths and so on.
But one thing has been on my mind for some time: What is the easiest way to distort/transform images to fit inside a selection? Often I want to fit an image into a selection I have made with the lasso tool, to follow polygon lines in the skin template.
Usually I can get away with using some of the transform tools, or just cutting the image into two or more pieces, then rotating the pieces to fit, really simple and manual approach. But I keep thinking there must be an easier way to do this?
How do you guys do it?
I did a quick Google, not sure if these will help or not...
and
- 402
- Canada
I accidently put the 80s logo on the bridge first (and can provide that)... but as to the rest of the skin, perhaps suggest an 80s version to Flow on OvertakeGreat work man.
Any chance of doing the 80's skins? A lot of F1 seasons need it. I have used the 90's skins which are ok but proper 82-87 skins would be nice.
- 724
- United Kingdom
only thing i use in GIMP really is the "curve bend" everything else pretty much is in PDNI've been using Gimp to edit and create skins for quite some time, and I've become fairly familiar with working with layers, masks, paths and so on.
But one thing has been on my mind for some time: What is the easiest way to distort/transform images to fit inside a selection? Often I want to fit an image into a selection I have made with the lasso tool, to follow polygon lines in the skin template.
Usually I can get away with using some of the transform tools, or just cutting the image into two or more pieces, then rotating the pieces to fit, really simple and manual approach. But I keep thinking there must be an easier way to do this?
How do you guys do it?
Last edited:
- 1,078
- Australia
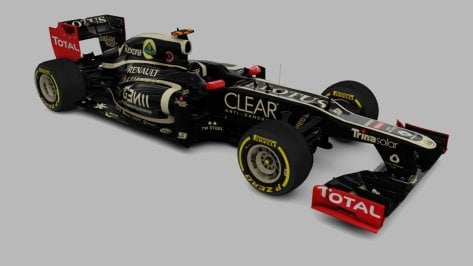
2012 Lotus E20 skinpack - same as before. Not all skins done but only the one with substantial logo changes etc.
Remember when Angry Birds was all the rage ? Pepperidge farm remembers !
Rd0 test

Rd1 Australia

Rd6 Monaco

Rd9 Silverstone

Rd19 COTA

mega.nz
Remember when Angry Birds was all the rage ? Pepperidge farm remembers !
Rd0 test
Rd1 Australia
Rd6 Monaco
Rd9 Silverstone
Rd19 COTA
101.09 MB file on MEGA
Attachments
- 3

- England
Hey guys just wondering if someone can do me a favour. I seem to have deleted some digital fonts so a few cars instrument panels don't display correctly, I did an integrity check but this hasn't fixed it, so could someone upload their full fonts folder? Thanks.
- 138
- Nation of Idiots
Here you go...hope this gives you everything you need:Hey guys just wondering if someone can do me a favour. I seem to have deleted some digital fonts so a few cars instrument panels don't display correctly, I did an integrity check but this hasn't fixed it, so could someone upload their full fonts folder? Thanks.
- 3
- England
Here you go...hope this gives you everything you need:
Thanks but it says 'you need access' I cant get to it...could you upload to an alternative site?
- 138
- Nation of Idiots
Sorry -- try it again.Thanks but it says 'you need access' I cant get to it...could you upload to an alternative site?
- 3
- England
Thank you so much that has sorted the problem!!Sorry -- try it again.
Last edited:
- 116
- United States
OkayA REQUEST:
Can any of the "gurus" check out why this Senna 1993 helmet is not showing properly.
The correct yellow helmet is in the /skins folder but no cigar.
f1_1993_mclaren
MediaFire is a simple to use free service that lets you put all your photos, documents, music, and video in a single place so you can access them anywhere and share them everywhere.www.mediafire.com
the skins are set for asr_driver_helmet
BUT
the driver model in the data file is set to an SD helmet driver 3d model
that is the issue
[MODEL]
NAME=Driver_SimDream_1993
POSITION=0,0,0
should be
[MODEL]
NAME=asr_driver_9x
POSITION=0,0,0
Last edited:
- 2,004
- Germany
I think there is the @racinjoe013 version available here.Guys, I need your help because unfortunately my SDD with Assetto Corsa on it recently said no, I don't want it anymore and so everything is gone. I wanted to ask you, there is a Spa 2022 standalone version but I can't find it anymore
- 52
Hi Guys
Here's a small update to the interior to the Dodge Chager STR8 GR.3 (Fictional Race Car) by JK1977
Do think that this car still needs a bit of work in the interior 3d model and texture allocations.
This is the best I can do with the textures allocated in this model
Copy my textures into each skins folder.
Update details:
- New alcn_NM and upscaled
- New alcnt and upscaled
- Added curves to Bulloni_Loghi texture and upscaled
- Added curves to detail_parts_out and upscaled
- Reworked details_racing_01 texture
- New Dirt_Metal_Scratches and upscaled
- New ext_plastic texture
- New red fabric_04_s texture and upscaled
- Reworked INT_ALCANTARA_AO and upscaled
- Reworked INT_CARBON_AO and upscaled
- Hue and surface blur added to LCD texture, upscaled too
- New leather texture and upscaled
- New MAT_Carbon texture and upscaled
- New MAT_Carbon_NM texture and upscaled
- Reworked metal_detail texture and upscaled
- Motec_LCD texture upscaled
- Reworked net_01_occ texture and upscaled
- New plastic_01_g texture and upscaled
- New plastic_01_g_n texture and upscaled
- Reworked interior racing_decals_g texture
- Curves added to interior red_parts texture and upscaled
View attachment 1391638View attachment 1391639View attachment 1391640View attachment 1391641View attachment 1391642
Download Dodge Chager STR8 GR.3 (Fictional Race Car) by @JK1977
Assetto Corsa PC Mods General Discussion
in the skin ext_config, if I replace number of "[MESH_ADJUSTMENT_X] (X is number 0/1/2/3) by [MESH_ADJUSTMENT_...]" wiper is working. other issue, I have very low power of braking, I tried with and without extended physics without succes. EDIT : I think it's because you haven't anything about...
")
hi, I was interested to know if you have the possibility of making this interior embellishment for the Hyundai Genesis GR.3. Thank you.
Last edited by a moderator:
Similar threads
- Replies
- 384
- Views
- 43K
- Replies
- 5
- Views
- 6K
- Replies
- 16
- Views
- 14K
