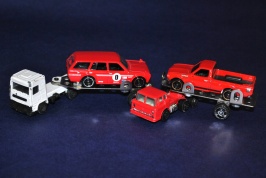
I've done a combination of things to get this look.
-Scratch off some body paint through scraping with the help of acetone.
-Loosely sprayed a red primer which I then scraped off partially with sandpaper.
-Dabbed on tan paint for the sandy coverage.
-Probably used a Tamiya Mud Stick for thick blots of dirt.
These were going to go into a sandy outdoor diorama.
Having disregarded its care for a year, they've been dumped in the nether zone in my backyard. :|
edit: I've a bunch of Weathered singles I made in the past you can have a detailed look at.
http://athobbies.blogspot.ca/2014/02/custom-diecasts-index.html#wea


 Here's my first attempt at a full car, (wheels and paint). It's a Plymouth GTX with the top side sprayed but I decided to keep the sides stock as I like the detail. Not lowered yet but I kinda like the stance as it is so I might just keep it stock.


