Hot Wheels and Matchbox Customizing Thread

  • Thread starter CodeRedR51
  • 9,230 comments
  • 1,223,538 views
Thanks dude. I wonder why you need lights there.
To show track position.

I mean last year it was
1 light= 3rd
2= 2nd
3= 1st

If I remember rightly it was changed though. Maybe not.
 
Hi everyone. Some of you may already know me from some of the other boards and my blog. AOS, I know we've chatted a few times in the past. I'm a big diecast collector and have been since 1995. Back in the day I did quite a bit of work with 1:24 1:25 scale models. I've now started to mess around with 1:64 scale. Here are some of my recent customs.

Blue/Patina Kool Kombi
hot-wheels-custom-kool-kombi-2-portfolio_zpsa8a9d162.png


Pink/Patina Kool Kombi
hot-wheels-custom-kool-kombi-3-portfolio_zps9393067a.png


Yellow/Patina Kool Kombi
10702169_10201719972001204_8653931330280810451_n_zps4b0b0b88.jpg


'Barn Find' Gulf Datsun
hot-wheels-custom-datsun-bluebird-510-portfolio_zpsc2903cc7.png


Geoffrey Tribute :)
hot-wheels-geoffrey-supervan-tribute-1-portfolio_zpsa52e3a3a.png
 
Welcome! Nice work, even tough the rust/patina style isn't my thing, I can appreciate when it's done right. And yours are.
 
I'm terribly sorry but I don't recognize the username. Might we have chatted from a Facebook group by any chance?
Hmm. I could have sworn it was over on the HWC boards. Maybe we never chatted? Regardless, I've certainly seen your work before. :)
 
Oh HWC. Okay. I stopped sharing my work there now. The people there have a lot of time on their hands to keep dishing out the same looking customs .

Plus they've got a narrow range in their taste for cars, can't construct proper sentences and have godawful images in their signatures. I find I'm unable to keep up with that atmosphere.


==============================================

Another simple job:

Before:
Lambo+Gallardo+SL+(blue).jpg


After:
%5BWS%5D%2BLambo%2BGallardo%2BSL%2B(blue)_1.jpg


%5BWS%5D%2BLambo%2BGallardo%2BSL%2B(blue)_2.jpg


%5BWS%5D%2BLambo%2BGallardo%2BSL%2B(blue)_3.jpg


%5BWS%5D%2BLambo%2BGallardo%2BSL%2B(blue)_4.jpg


Did the wheels (obviously), coloured the base black (didn't have black spray paint at the time), and the rear lights.
 
Last edited:
I decided not to because the steelie wheel has enough large bright shiny circular elements already to meet that quota. The tires are also very thin so I didn't want to lose the presence of the tires by adding white. It lacks the pop the WLs give, but I guess that's a compromise.
 
I decided not to because the steelie wheel has enough large bright shiny circular elements already to meet that quota. The tires are also very thin so I didn't want to lose the presence of the tires by adding white. It lacks the pop the WLs give, but I guess that's a compromise.

Yeah the tires that come with the steelies are indeed quite thin. I made some white-line steelies with tires that came from other set of axles, but they weren't the same kind of tire that fits the steelies once you pop them in the barrels, as they look "inflated" right in the middle of the contact patch due to the rib the barrel of the wheel has to "grab" the tire. Fortunately, that gave them quite a nostalgic look, which was perfect for the bubbletop Impala that will wear them. Still a long way to go, that one, but it'll be a slammed custom with scallops all over the place and a possibly a mexican blanket interior.
 
Even when doing a matte finish car, I shoot the body with gloss clear before decals. This provides a uniform surface for the decal to adhere to. If you were to look VERY closely at the surface of a matte finish, you would find that instead of being smooth, it is 'ridged'. This would stop the decal from adhering properly and may lead to 'silvering' (trapped air between the decal and the surface of the casting).
 
Even when doing a matte finish car, I shoot the body with gloss clear before decals. This provides a uniform surface for the decal to adhere to. If you were to look VERY closely at the surface of a matte finish, you would find that instead of being smooth, it is 'ridged'. This would stop the decal from adhering properly and may lead to 'silvering' (trapped air between the decal and the surface of the casting).

Do I need to spray a clear coat onto the waterslide paper before printing?
 
NO!!! This will KILL your printer. Print the decals first. Let them dry overnight. After that, then clear coat them.

I typically can't wait that long and clear them much sooner without any problems but I'd hate for it to go wrong for you.
 
(Sorry for double post) Here's a Scion FRS I completed today, although I'm planning on re-spraying it because it's a little sloppy. Also, if you're ever at Wal-Mart, pick up some paint pens, they're cheap. They're awesome to use for wheels, like in the picture below. Or for detailing, whatever.
frs blue and white 2.png
 
If you were to look VERY closely at the surface of a matte finish, you would find that instead of being smooth, it is 'ridged'.

That is why a matte is a matte. Matte finishes are made to not directly reflect highlights, or in layman terms, not look glossy. Reflections are light bouncing off a surface. If the surface is uniform and the material property doesn't absorb a lot of light, we can see clearly-defined reflected images. When you see a shiny car with all those white dots in sunny weather, those spots are reflected images of the sun.

When a surface is not smooth, at a microscopic level, the surface is jagged, peaky, uneven, you name it. When we run our hands over it, you feel some abrasive texture to it. Light still bounces off i, but because it's not smooth, we don't get uniform reflections, thus we don't see clearly-defined reflected images. The light rays are bouncing all over the place, which is often why you won't see focused highlights like the shiny car with the reflected images of the sun.


Aside from that, I want to suggest to anyone working with flat/matte paint to avoid touching the paint as much as possible, let alone running a finger over it. That texture I talked about earlier serves as an abrasive surface for you to shed your skin on it. I had cars painted flat black, and now I can see lighter spots where I had my fingers. Avoid touching it until you put down some clear protective layer.


================
Edit 22 hours later:

Some more retailer buffs to dish out.

%5BWS%5D%2BBMW%2BM3_black_1.jpg


%5BWS%5D%2BBMW%2BM3_black_2.jpg


All '10 BMW M3 models are not to be added to my collection. I started this idea with the Graffiti Ride '65 Bonneville, where I would grab them solely for a wheelswap. The rear lights are painted in, as well as an attempt at correcting the grill tampo that was poorly stamped on. Did the door handles, and coloured the base and exhausts.

I've done it for the red as well as the white M3. Thought I may as well complete the set. Here with the black, I aim for a luxury appeal with Matchbox's 10-spoke. The blue on the other hand:

%5BWS%5D%2BBMW%2BM3_Blue_1.jpg


%5BWS%5D%2BBMW%2BM3_Blue_2.jpg


I go for the performance appeal. Basic 10-spoke wheels in gunmetal gray. I think I lowered them both, but it doesn't seem to look like it. Exhaust tips are done in, as well as the primary grill. The light tampos were off so I had end up redoing it entirely. Door handles are done in too, and the side vent detailing is much more noticeable than the black M3.


And for the sake of it, here are the other two I did some time ago:

bmw_m3_10_white.jpg
bmw_m3_10_red.jpg
 
Last edited:
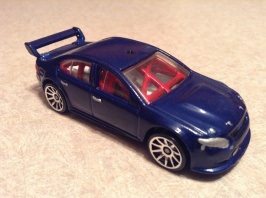
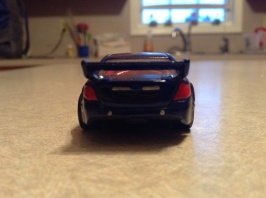
Here is a Ford Falcon Race Car I recently did. This was just a duplicate that I had got from a 3 pack that I decided to customize since I already had another one just like it. I really didn't want much for it and as a matter of fact it kind of served as a "test bed" for trying out Model Master's Royal Blue Pearl (Ford) I bought to see if I will use it for future projects. Of course I added a lot of detailing as usual.

(Excuse the darkness in some photos)

image.jpg

image.jpg

image.jpg

image.jpg

image.jpg

And of course I didn't forget the interior. ;) I just added what ever colors I wanted no matter how weird it looked. :P
image.jpg

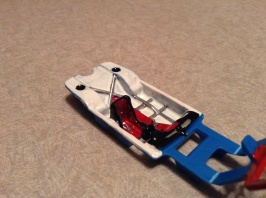
Here it is opened up. A lot of detailing done here, even the seatbelts are detailed.
image.jpg

I have more finished customs I will post later. ;)
 
Back